Building a strong and well-developed chest is a cornerstone in achieving a balanced and powerful upper body. Chest workouts, targeting the pectoral muscles, are not just about aesthetics; they play a pivotal role in enhancing overall upper body strength, improving posture, and increasing functional power in daily activities.
A robust chest contributes significantly to several key movements, such as pushing, lifting, and throwing, which are integral to various sports and everyday tasks. Additionally, a well-developed chest helps in maintaining a well-proportioned, athletic physique, which can boost confidence and overall body image.
From a health perspective, engaging in regular chest exercises can aid in improving bone density, joint stability, and muscle balance, reducing the risk of injuries. It also contributes to better respiratory function, as the pectoral muscles are closely linked to the mechanics of breathing.
In summary, incorporating chest exercises into your fitness regimen is not just about building muscle mass; it’s about enhancing your overall strength, functionality, and health. The subsequent sections will delve into the top seven chest exercises that are effective for developing both strength and size in the chest area.
Anatomy of the Chest
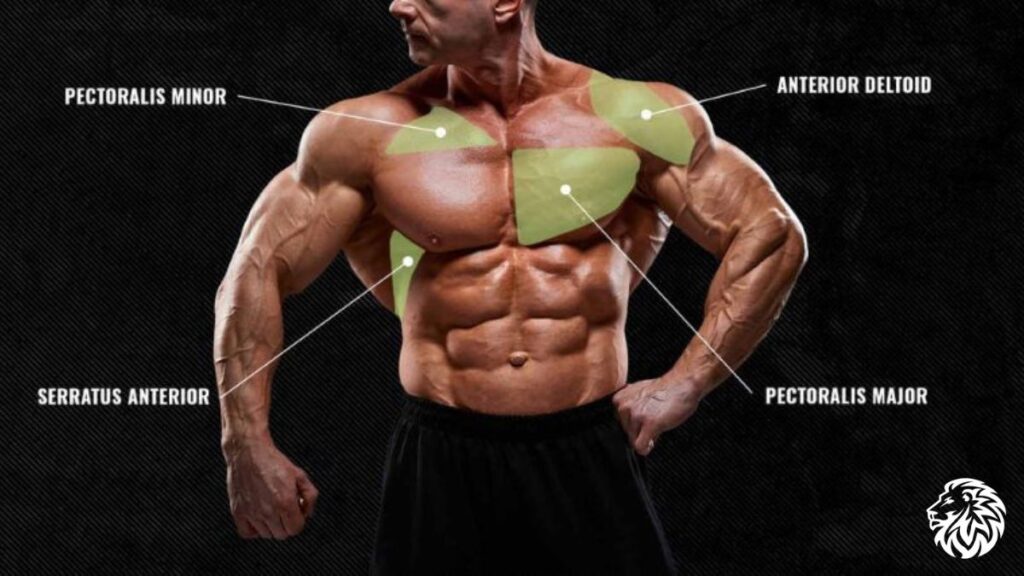
Understanding the anatomy of the chest is crucial for effectively targeting and developing these muscles through exercise. The chest primarily comprises two major muscles: the pectoralis major and the pectoralis minor.
- Pectoralis Major: This is the larger and more prominent of the two chest muscles. It spans across the upper chest, attaching to the sternum, shoulder blade, and collarbone. The pectoralis major is responsible for several key movements of the arm, including flexion (raising the arm), adduction (moving the arm toward the body), and rotation. When you perform exercises like bench presses or push-ups, it’s the pectoralis major that plays the leading role in executing these movements.
- Pectoralis Minor: Located beneath the pectoralis major, this smaller muscle extends from the upper ribs to the scapula (shoulder blade). Its primary function is to stabilize the scapula by drawing it down and toward the chest wall. This muscle is engaged during exercises that involve scapular movement or stabilization, like certain types of chest fly movements or push-up variations.
During exercise, these muscles work together to enable a range of movements. When you lift weights or perform resistance training targeting the chest, these muscles contract to push against the resistance. Over time, with consistent training and proper technique, this leads to increased muscle strength and size. It’s important to engage both muscles through a variety of exercises for balanced chest development and to enhance overall upper body functionality.
The Top 7 Chest Exercises for Strength and Size
Exercise 1: Barbell Bench Press
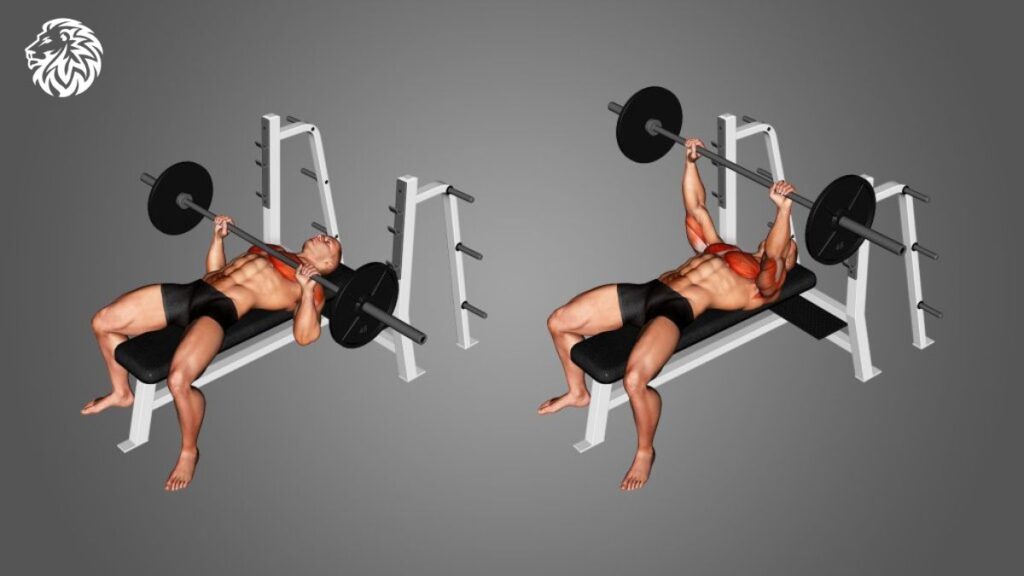
The barbell bench press is a classic and fundamental exercise for chest development, renowned for its effectiveness in building strength and size in the pectoral muscles.
Description of the Exercise:
The barbell bench press primarily targets the pectoralis major, while also engaging the triceps and deltoids. This exercise is performed using a barbell and a flat bench.
Step-by-Step Instructions:
- Starting Position: Lie flat on the bench with your feet firmly planted on the floor. Grip the barbell with hands slightly wider than shoulder-width apart.
- Lift Off: Unrack the barbell by straightening your arms and hold it directly above your chest with your arms locked.
- Descending Phase: Inhale and slowly lower the barbell down to your mid-chest. Keep your elbows at about a 45-degree angle to your torso.
- Bottom Position: Briefly pause when the bar is just above your chest. Ensure the bar doesn’t bounce off your chest.
- Ascending Phase: Exhale and push the barbell back up to the starting position, using your chest muscles to drive the movement.
- Repeat: Perform the desired number of repetitions while maintaining good form.
Benefits for Chest Development:
- Muscle Growth: The bench press is a compound movement, meaning it targets multiple joints and muscles, leading to significant muscle hypertrophy (growth).
- Upper Body Strength: Regularly performing barbell bench presses increases overall upper body strength, benefiting other lifts and daily activities.
- Versatility: Variations like incline or decline bench press can target different areas of the chest, allowing for comprehensive chest development.
- Balance and Stability: Stabilizing the barbell during the exercise helps improve balance and coordination in the upper body.
Incorporating the barbell bench press into your chest workout routine can significantly enhance both the strength and size of your chest muscles. However, it’s crucial to maintain proper form and start with a weight that is manageable to avoid injury.
Exercise 2: Incline Dumbbell Press
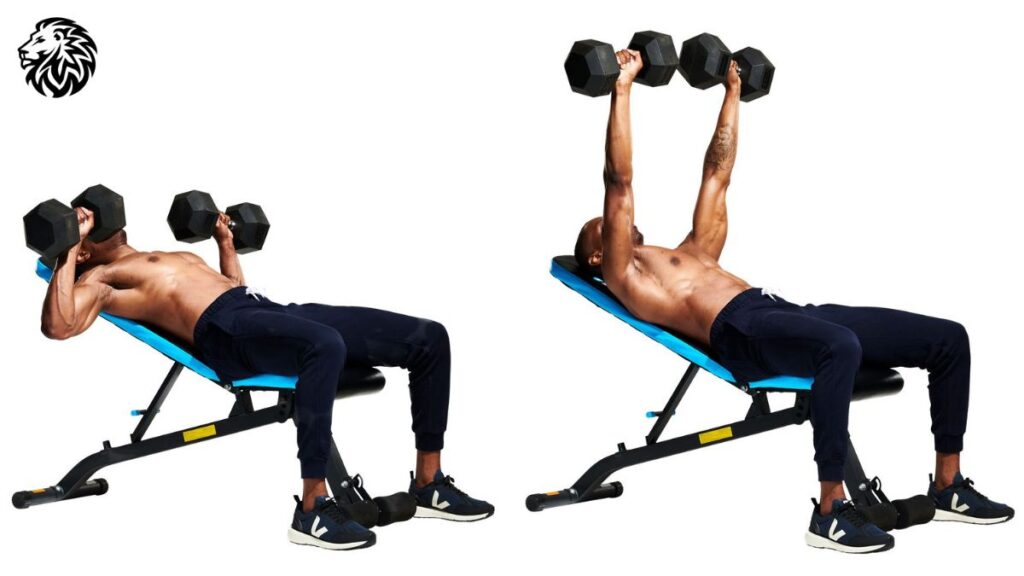
The incline dumbbell press is a versatile and effective exercise for targeting the upper portion of the chest, offering a greater range of motion compared to barbell presses.
Overview of the Exercise:
This exercise is performed on an incline bench, typically set at a 15-45 degree angle. It primarily targets the upper pectoral muscles, while also engaging the shoulders and triceps.
Detailed Instructions for Proper Form and Technique:
- Starting Position: Sit on an incline bench with a dumbbell in each hand at shoulder level, palms facing forward.
- Foot Placement: Plant your feet firmly on the ground for stability.
- Lift and Lock: Press the dumbbells up above your chest, extending your arms fully. Keep your wrists straight and avoid locking your elbows.
- Descending Phase: Slowly lower the dumbbells to the sides of your chest. Keep your elbows at a 45-degree angle to reduce strain on the shoulder joints.
- Bottom Position: Pause briefly when the dumbbells are level with your chest.
- Ascending Phase: Exhale and push the dumbbells back up to the starting position, focusing on using your chest muscles to drive the movement.
- Repeat: Perform the desired number of reps, maintaining control and form throughout.
Targeting Different Parts of the Chest:
- The incline angle of the bench shifts the focus to the upper pectorals, an area that can be challenging to develop.
- This angle also allows for a deeper stretch at the bottom of the movement, engaging more muscle fibers in the chest.
- Dumbbells require each side of your body to work independently, improving muscle balance and addressing any strength imbalances.
- The ability to rotate your wrists during the press can help engage different parts of the chest more effectively.
Incorporating the incline dumbbell press into your chest regimen ensures a comprehensive development of the chest muscles, especially focusing on the upper chest for a fuller, more balanced appearance. As always, start with a weight that allows you to maintain proper form to maximize benefits and minimize injury risk.
Exercise 3: Push-Ups
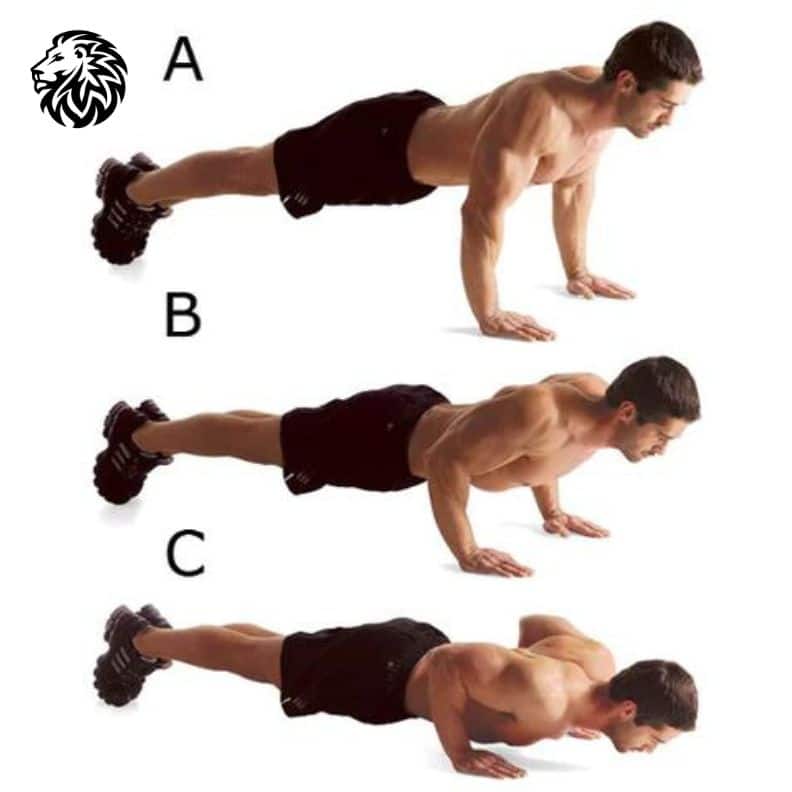
Push-ups are a classic bodyweight exercise that effectively builds chest strength and endurance. They are versatile, requiring no equipment, and can be adapted to various skill levels.
Introduction to Push-Ups and Their Variations:
- Standard Push-Up: Targets the chest, shoulders, and triceps.
- Wide-Grip Push-Up: Places more emphasis on the chest.
- Diamond Push-Up: Focuses on the triceps and inner chest.
- Decline Push-Up: Elevates the feet to increase upper chest activation.
- Plyometric Push-Up: Incorporates an explosive element to increase power.
Guide on Performing Standard and Advanced Push-Ups:
- Standard Push-Up:
- Start in a plank position with hands placed slightly wider than shoulder-width apart.
- Keep your body in a straight line from head to heels.
- Lower your body until your chest nearly touches the ground.
- Push back up to the starting position.
- Wide-Grip Push-Up:
- Begin in a standard push-up position but with your hands set wider than your shoulders.
- Lower your body, keeping elbows pointed out slightly.
- Push back to the start position.
- Diamond Push-Up:
- Place your hands close together under your chest, forming a diamond shape with your fingers.
- Lower your body, keeping elbows close to your torso.
- Push back up, focusing on the triceps and inner chest.
- Decline Push-Up:
- Place your feet on an elevated surface (like a bench or step) and hands on the ground.
- Lower your body, maintaining a straight line.
- Push back up, targeting the upper chest.
- Plyometric Push-Up:
- Start in the standard push-up position.
- Lower your body, then explosively push up so your hands leave the ground.
- Land softly and repeat.
Contribution to Chest Strength and Endurance:
- Push-ups are an effective way to build muscular endurance and strength in the chest, shoulders, and triceps.
- They engage the core, promoting stability and overall body coordination.
- Regularly performing push-ups can enhance functional strength, useful in everyday activities and sports.
- They improve muscle tone and can be a useful tool in fat loss and body composition programs.
Push-ups are a versatile and accessible exercise suitable for all fitness levels. They can be easily modified to increase or decrease intensity, making them a staple in any chest-strengthening routine.
Exercise 4: Chest Dips
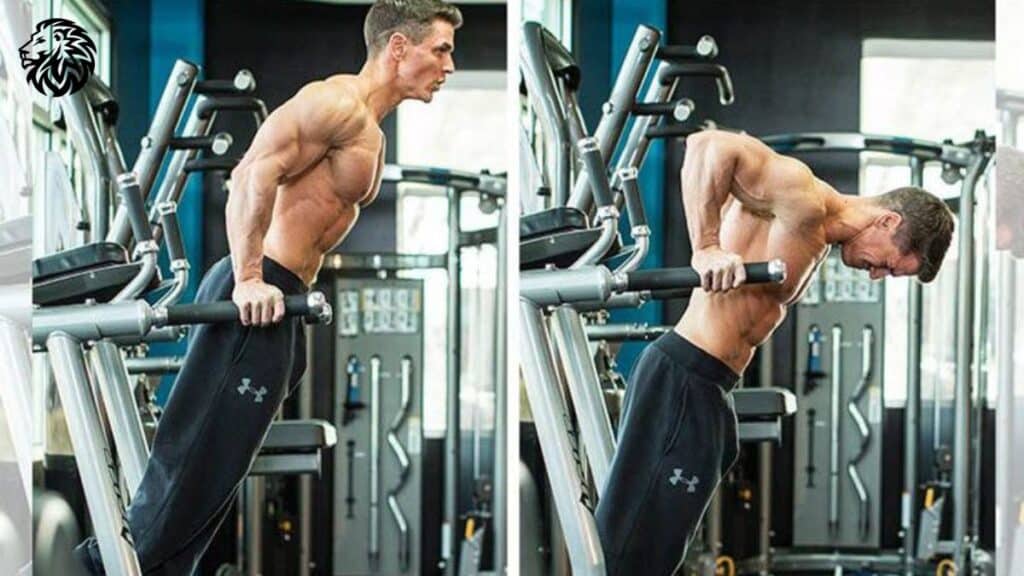
Chest dips are an effective compound exercise that primarily targets the lower portion of the pectoral muscles, as well as the triceps and shoulders.
Explanation of Chest Dips and Their Impact:
- Primary Muscles Targeted: Focuses on the lower chest, triceps, and anterior deltoids.
- Execution: Performed using parallel bars or a dip station.
- Impact: Enhances overall chest depth and definition, improves pushing strength, and aids in the development of a strong upper body.
Instructions on Execution and Common Mistakes to Avoid:
- Starting Position: Grip the bars and hoist yourself up to a starting position with arms locked.
- Descending Phase: Lean forward slightly and bend your elbows to lower your body. Keep elbows at a 45-degree angle.
- Depth: Go down until your shoulders are slightly below your elbows, or as far as comfortably possible.
- Ascending Phase: Push back up to the starting position, focusing on using your chest muscles.
- Breathing: Inhale on the way down, exhale on the push-up.
Common Mistakes:
- Going Too Low: Descending too far can put undue stress on the shoulders.
- Flaring Elbows: This can strain the shoulder joints and reduce chest engagement.
- Not Leaning Forward: Staying upright targets the triceps more than the chest.
- Jerky Movements: These can lead to loss of control and potential injury.
Tips to Increase Intensity for Advanced Individuals:
- Weighted Dips: Add a weight belt or hold a dumbbell between your feet.
- Slow Tempo: Perform the exercise with a slower, more controlled tempo to increase muscle tension.
- Pause Reps: Pause at the bottom of the dip for a couple of seconds before pushing back up.
- Partial Reps: After completing a set, do a few partial reps (halfway down, then back up) to further fatigue the muscles.
- Superset with Push-Ups: Immediately follow dips with a set of push-ups to exhaust the chest muscles.
Chest dips are a powerful exercise for developing a strong, well-rounded chest. They require good upper body strength and control, so it’s important to progress gradually and focus on proper form to maximize benefits and minimize the risk of injury.
Exercise 5: Pec Deck Machine
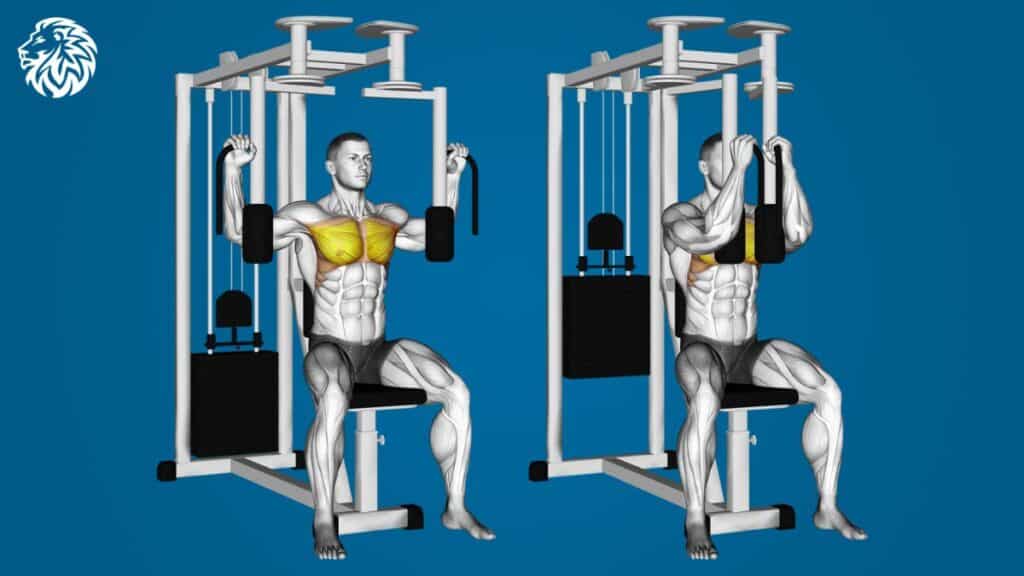
The pec deck machine is a popular gym apparatus designed for isolating and developing the chest muscles, specifically targeting the pectoralis major.
Description of the Pec Deck Machine and Its Use:
- Design: Consists of a seat with a backrest, two arms or pads to place your forearms against, and a weight stack for resistance.
- Function: Designed to simulate the chest fly movement, focusing on squeezing the chest muscles together.
Guidelines for Safe and Effective Usage:
- Seat Adjustment: Adjust the seat so that when you sit, the machine’s handles are at chest level.
- Starting Position: Sit with your back firmly against the pad, grasp the handles or position your arms on the pads, elbows slightly bent.
- Movement: Bring the handles or pads together in front of your chest in a smooth, controlled motion.
- Squeeze and Hold: Once your hands or elbows are in line with each other, hold the position briefly to maximize muscle contraction.
- Return Phase: Slowly return to the starting position, maintaining control and avoiding letting the weights slam.
- Breathing: Exhale as you bring the handles together, inhale as you return to the starting position.
Common Mistakes to Avoid:
- Overextending: Don’t stretch too far back as it can put unnecessary strain on your shoulders.
- Rushing the Movement: Performing the exercise too quickly reduces muscle engagement and increases risk of injury.
- Improper Alignment: Ensure your arms are at the right height to effectively target the chest muscles.
Insights into How This Isolation Exercise Benefits Chest Development:
- Targeted Muscle Activation: The pec deck machine isolates the chest muscles, allowing for focused work on the pectorals without significant assistance from other muscle groups.
- Muscle Hypertrophy: The controlled movement and sustained tension stimulate muscle growth.
- Balance and Symmetry: Using a machine ensures that both sides of the chest are worked equally, promoting balanced development.
- Suitable for All Levels: This machine is user-friendly for beginners, yet also effective for advanced users when increased resistance is used.
The pec deck machine is an excellent tool for adding variety to your chest workout, especially for targeting the inner chest muscles. Its controlled movement pattern makes it a safe choice for those who are new to chest training or are recovering from injury.
Exercise 6: Cable Fly
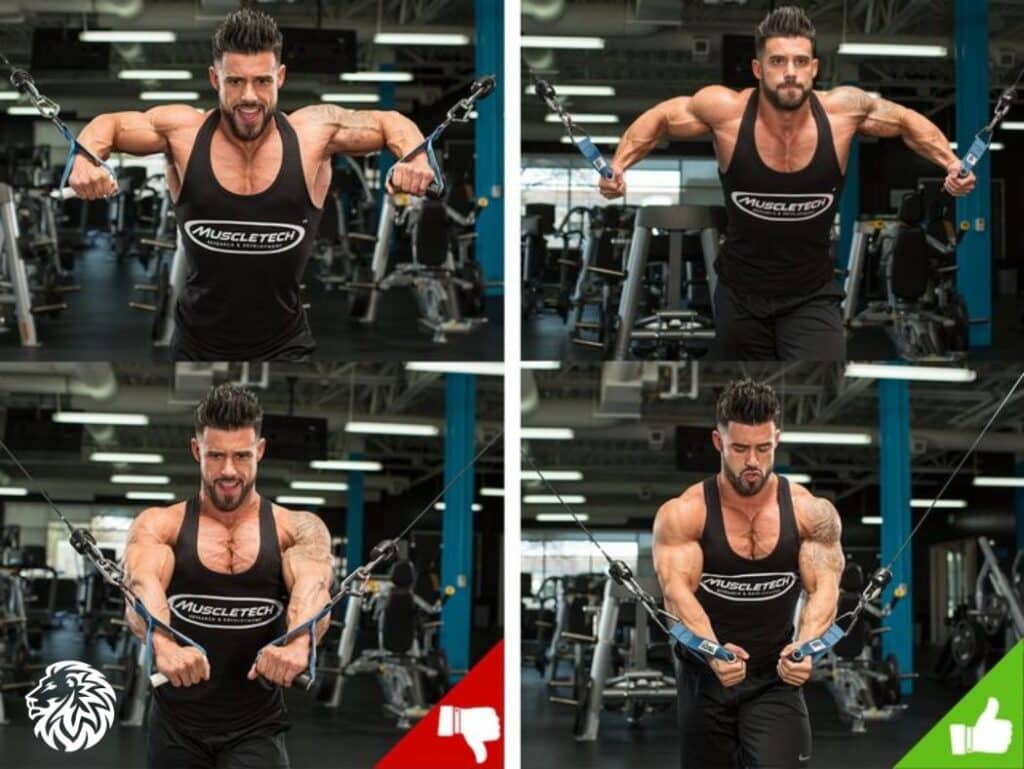
The cable fly is a versatile chest exercise that utilizes a cable machine to provide constant tension on the chest muscles throughout the movement, offering a unique stimulus compared to free weights.
Overview of Cable Fly and Its Variations:
- Standard Cable Fly: Performed standing, with cables set at chest height.
- High Cable Fly: Cables are positioned above head height, targeting the lower chest.
- Low Cable Fly: Cables are set near the floor, emphasizing the upper chest.
- Single-Arm Cable Fly: Using one arm at a time for increased focus and muscle isolation.
Detailed Instructions on Proper Form and Execution:
- Starting Position: Stand in the middle of a cable machine with a handle in each hand. Set the cables to chest height for the standard version.
- Stance: Slightly bend your knees and lean forward, maintaining a straight back.
- Arm Position: Extend your arms to the sides, elbows slightly bent, and palms facing forward.
- Movement: Bring your hands together in front of your chest in a wide arc. Keep the elbows fixed in a slightly bent position.
- Contraction: Squeeze your chest muscles as your hands meet.
- Return Phase: Slowly return your arms back to the starting position, maintaining tension on the cables.
- Breathing: Exhale as you bring your hands together, inhale as you return to the start.
Common Mistakes to Avoid:
- Overextending: Don’t let your arms go back too far as it can strain the shoulder joints.
- Losing Tension: Keep constant tension on the cables throughout the entire movement.
- Too Much Weight: Using excessive weight can lead to form breakdown and reduced effectiveness.
Benefits of Cable Fly for Chest Sculpting:
- Constant Tension: The cables provide continuous resistance, engaging the chest muscles throughout the entire range of motion.
- Targeted Stimulation: Helps in sculpting and defining the chest muscles, particularly effective for working on the inner and outer pecs.
- Versatility: The different variations allow for targeted work on various parts of the chest.
- Controlled Movement: Reduces the risk of injury and allows for a focus on muscle contraction and control.
Incorporating cable flies into your chest routine can enhance the overall shape and definition of your chest. This exercise complements heavier compound movements, offering a balanced approach to chest development.
Exercise 7: Dumbbell Pullover
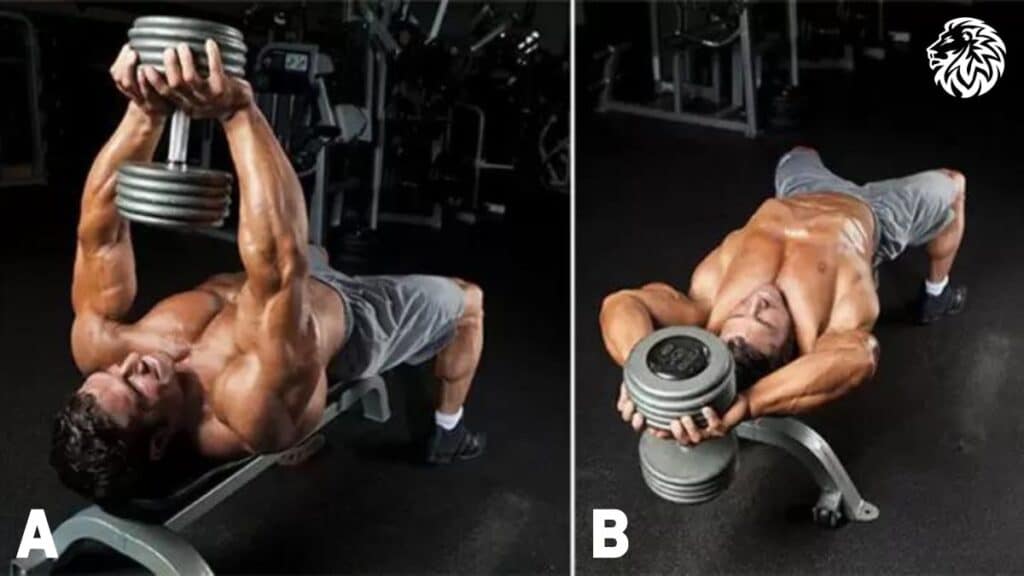
The dumbbell pullover is a unique exercise that targets not only the chest but also engages the back muscles, making it a great addition to an upper body workout routine.
Introduction to Dumbbell Pullovers:
- Primary Target: Works both the pectoral and latissimus dorsi (back) muscles.
- Equipment Used: Requires a single dumbbell and a bench.
- Movement: Involves moving the dumbbell over and behind the head in an arc.
Step-by-Step Guide on Performing the Exercise:
- Starting Position: Lie across a flat bench with only your upper back and shoulders on the bench. Your hips should be lower than your chest, and feet planted firmly on the floor.
- Grip the Dumbbell: Hold a dumbbell with both hands under one end of the dumbbell, arms extended above your chest.
- Lowering Phase: Slowly lower the dumbbell back and over your head, keeping your arms slightly bent.
- Depth: Go as deep as comfortably possible without straining. You should feel a stretch in your chest and lats.
- Raising Phase: Bring the dumbbell back to the starting position in the same arc motion.
- Breathing: Inhale as you lower the dumbbell, exhale as you raise it back up.
Explanation of Its Unique Benefits for the Chest and Upper Body:
- Chest Expansion: The pullover stretches the chest muscles extensively, promoting muscle flexibility and growth.
- Upper Body Development: It uniquely engages both the chest and back muscles, contributing to a more balanced upper body development.
- Ribcage Expansion: Some believe that pullovers can help in expanding the ribcage, giving a broader upper body appearance.
- Versatility: Can be performed with variations, like using a barbell or performing on a decline bench.
The dumbbell pullover is a distinctive exercise that works multiple muscle groups simultaneously, offering a comprehensive upper body workout. It’s important to perform this exercise with proper form and a controlled motion to maximize its benefits and prevent injury.
Incorporating These Exercises into Your Routine

Effectively integrating these chest exercises into your workout regimen is key to achieving balanced and significant gains in strength and size.
Tips on How to Effectively Include These Exercises:
- Balance Compound and Isolation Movements: Combine exercises like the bench press and push-ups with isolation moves like the pec deck and cable fly.
- Variety in Workouts: Rotate these exercises through your chest days to target the muscles from different angles and prevent boredom.
- Proper Warm-Up: Begin each session with a warm-up to prepare the muscles and reduce injury risk, focusing on dynamic stretches and light cardio.
Recommendations for Sets, Reps, and Frequency:
- Beginners: Start with 3 sets of 8-12 reps for each exercise. Train your chest 1-2 times per week.
- Intermediate to Advanced: Increase to 3-4 sets with varying rep ranges (6-15) to target both strength and hypertrophy. Train chest up to 2 times per week.
- Volume and Intensity: Ensure a balance between volume (total sets and reps) and intensity (weight used) to avoid overtraining.
Advice on Progression and Avoiding Plateaus:
- Progressive Overload: Gradually increase the weight, reps, or sets over time to continually challenge your muscles.
- Technique First: Focus on perfecting form before increasing weight to maximize muscle engagement and prevent injury.
- Rest and Recovery: Allow adequate rest between chest workouts (48-72 hours) for muscle recovery and growth.
- Vary Your Routine: Change your exercise selection, order, or rep scheme every 4-6 weeks to keep your muscles adapting.
- Monitor Nutrition and Sleep: Ensure you’re consuming enough protein for muscle repair and getting sufficient sleep for recovery.
- Track Your Workouts: Keep a log to monitor your progress and make adjustments as needed.
By following these guidelines, you can effectively incorporate these exercises into your routine for optimal chest development. Remember, consistency, proper form, and a balanced approach to training and recovery are essential for continuous improvement and avoiding plateaus.
Safety and Precautions

Ensuring safety during chest workouts is crucial to prevent injury and promote long-term health and fitness. Proper warm-up, cool-down, and exercise technique are key components.
Importance of Warm-Up and Cool-Down:
- Warm-Up: Prepares the muscles, joints, and cardiovascular system for the workout, reducing the risk of strains or tears. Include 5-10 minutes of light cardio and dynamic stretches focusing on the upper body.
- Cool-Down: Helps to gradually lower the heart rate and prevent muscle stiffness. Include light stretching of the chest, shoulders, and back to aid recovery.
Tips to Prevent Injury During Chest Workouts:
- Proper Form: Always prioritize form over the amount of weight lifted. Incorrect form can lead to injuries, especially in the shoulder and back areas.
- Controlled Movements: Avoid jerky or ballistic movements. Perform exercises in a controlled manner to ensure muscle engagement and reduce strain on joints.
- Appropriate Weight: Start with weights you can manage and gradually increase as you get stronger. Overloading too quickly can cause injury.
- Listen to Your Body: Pay attention to any pain or discomfort. Discomfort is normal, but sharp pain is a sign to stop.
- Balance Your Routine: Work on all muscle groups evenly to avoid imbalances that can lead to poor posture and injury.
- Use a Spotter for Heavy Lifts: Especially for exercises like the bench press, having a spotter can prevent accidents if you’re unable to lift the weight.
Guidance on When to Seek Professional Advice:
- Persistent Pain or Discomfort: If you experience ongoing pain during or after workouts, it’s important to consult a healthcare professional.
- Post-Injury Training: Seek advice from a physical therapist or qualified trainer to ensure safe training methods post-injury.
- Form Check: If unsure about your form, especially for complex lifts, consider hiring a personal trainer for guidance.
- Health Conditions: Individuals with pre-existing health conditions should consult a doctor before starting any new exercise regimen.
Remember, safety in exercise is as important as the exercise itself. Taking the right precautions can ensure a healthy and sustainable fitness journey.
Conclusion
In this article, we’ve explored the top seven chest exercises for strength and size, each offering unique benefits to your workout routine. From the foundational barbell bench press to the isolating pec deck machine, these exercises provide a comprehensive approach to chest development. We emphasized the importance of proper form, technique, and safety precautions to maximize effectiveness and minimize the risk of injury.
Recap of Key Points:
- Variety in Exercises: Incorporate a mix of compound and isolation exercises to target the chest from different angles.
- Progressive Overload: Gradually increase the intensity of your workouts to continue challenging your muscles.
- Form and Safety: Prioritize proper form and heed safety guidelines to prevent injury and ensure long-term progress.
- Balance in Training: A balanced approach, including rest and recovery, is crucial for sustainable growth and overall fitness.
Building strength and size in the chest, or any muscle group, requires time and consistent effort. Patience is key; results will not happen overnight, but with dedication and persistence, you’ll see progress. Celebrate the small victories along the way, and stay committed to your fitness journey.
While focusing on the chest is important, remember that overall fitness and health involve a holistic approach. This includes working on all muscle groups, maintaining cardiovascular health, ensuring proper nutrition, and allowing adequate rest. A balanced fitness routine leads to not just a strong and aesthetically pleasing physique but also enhances your overall well-being and quality of life.
Integrate these chest exercises into your routine, stay dedicated, and enjoy the journey towards a stronger, healthier you. Remember, the path to fitness is a marathon, not a sprint, and a well-rounded approach will ensure you reach your goals safely and sustainably.
