Core strength is fundamental to not only achieving an aesthetically pleasing midsection but also to ensuring overall physical health and stability. The muscles in your core, which include the abdominals, obliques, and lower back, serve as the central link connecting your upper and lower body. A strong core enhances balance and stability, preventing falls and injuries during daily activities and athletic pursuits. It also plays a pivotal role in maintaining good posture and relieving lower back pain.
Incorporating specific exercises to target these core muscles is crucial for developing and maintaining strength in this area. The 12 exercises outlined in this article are meticulously selected to cater to a wide range of fitness levels. Whether you are a beginner or an advanced athlete, these exercises offer scalable challenges that can be adjusted to suit your individual strength and skill level. From the Abs Wheel Rollout to the classic Plank and Side-Plank, each exercise focuses on different aspects of core strength and stability.
As you embark on this journey to shape and strengthen your core, remember that consistency and proper form are key. These exercises are designed not just to sculpt your midsection but to build a stronger, more resilient body that can stand up to life’s physical demands. So, let’s dive into these 12 best abs exercises and explore how they can transform your core strength and overall fitness.
12 Best Abs Exercises to Shape Your Core
1. Abs Wheel Rollout
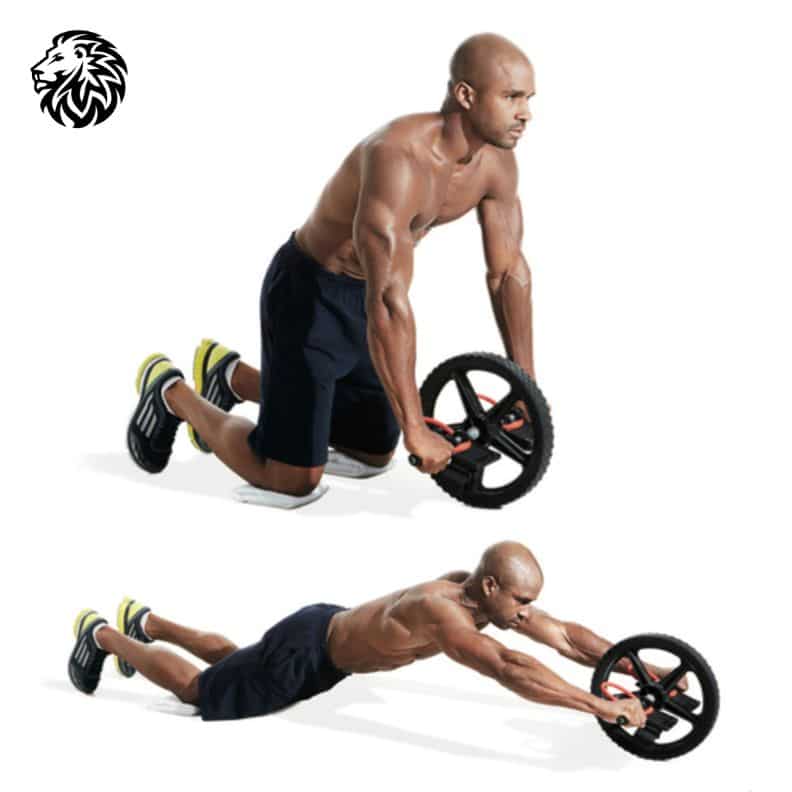
Introduction to the Exercise: The Abs Wheel Rollout is a challenging yet highly effective exercise for building core strength. This exercise primarily targets the rectus abdominis (the six-pack muscles), the obliques, and the muscles of the lower back, making it a comprehensive core workout. It also engages the shoulders, chest, and arms, providing a more extensive workout experience.
Step-by-Step Guide:
- Starting Position: Begin by kneeling on the floor with the abs wheel in front of you. Grasp the handles of the wheel with both hands, one on each side.
- Rolling Out: Slowly roll the wheel forward, straightening your arms and extending your body. Keep your back straight and core engaged throughout the movement.
- Reaching Full Extension: Extend as far as you can without allowing your hips to sag or your back to arch. Your body should form a straight line from your head to your knees.
- The Return Movement: Using your core muscles, pull yourself back to the starting position by rolling the wheel towards your knees.
- Repeat: Aim for a set of 8-12 repetitions, depending on your fitness level.
Tips for Beginners:
- Start Slowly: If you’re new to this exercise, start with a small range of motion and gradually increase as your strength improves.
- Maintain Proper Form: Keep your back straight and avoid arching it. Your core should be engaged and doing most of the work.
- Use a Mat: Kneeling on a mat can provide extra comfort for your knees.
- Controlled Movements: Perform the rollouts slowly and with control. Avoid jerky or rushed movements to prevent injury.
- Breathing: Breathe in as you roll out and exhale as you roll back in. Proper breathing helps maintain core engagement.
- Listen to Your Body: If you feel any pain, especially in the lower back, stop the exercise and consult with a fitness professional to ensure you’re performing it correctly.
2. Weighted Straight-Leg Sit-ups
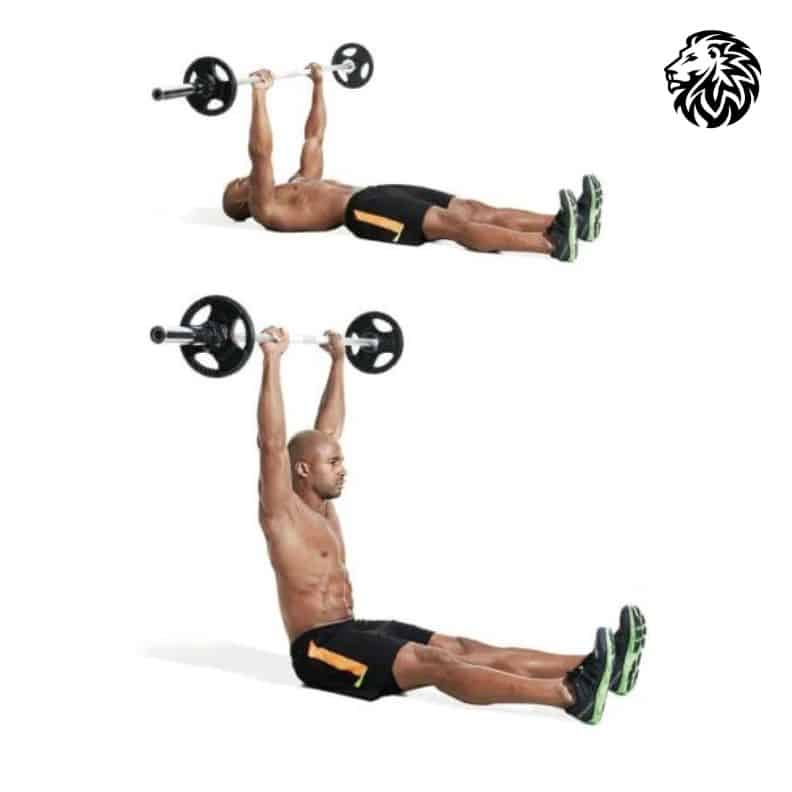
Explanation of the Exercise: Weighted Straight-Leg Sit-ups are a variation of the classic sit-up exercise, enhanced by adding weight for increased resistance. This exercise targets the rectus abdominis and the hip flexors, while also engaging the lower back and obliques. Adding weight increases the intensity of the workout, making it more challenging and effective for core strengthening.
How to Perform It Correctly:
- Starting Position: Lie on your back on a mat with your legs extended straight. Hold a weight (like a dumbbell or a medicine ball) with both hands on your chest or extended above your chest.
- The Sit-up Motion: Engage your core and lift your upper body off the ground towards your knees, keeping your legs straight. Keep the weight close to your chest or maintain it extended above you as you sit up.
- Reaching the Top: Sit up until your upper body is perpendicular to the floor, or as high as you can comfortably go without straining your back.
- Lowering Down: Slowly lower your upper body back to the starting position, keeping the movement controlled.
- Repetition: Perform 8-15 repetitions per set, depending on your fitness level and the weight’s heaviness.
Safety Tips and Variations:
- Start with Light Weight: If you’re new to this exercise, start with a light weight or no weight at all to get used to the movement.
- Keep Movements Controlled: Avoid jerking or using momentum to sit up, as this can strain the back or neck.
- Protect Your Neck: Avoid pulling on your neck with your hands if they’re placed behind your head. Keep your neck in a neutral position.
- Foot Position: Your feet can be flat on the floor or slightly elevated for added intensity.
- Alternate Weight Position: For variation, you can hold the weight overhead throughout the movement, which also engages the shoulders and arms more intensively.
- Without Weights: If weights are not available or if you’re a beginner, perform the exercise without weights until you build sufficient strength.
- Listen to Your Body: If you experience any pain, particularly in the back or neck, stop the exercise. Consider consulting a fitness professional to ensure proper form.
3. Barbell Russian Twist
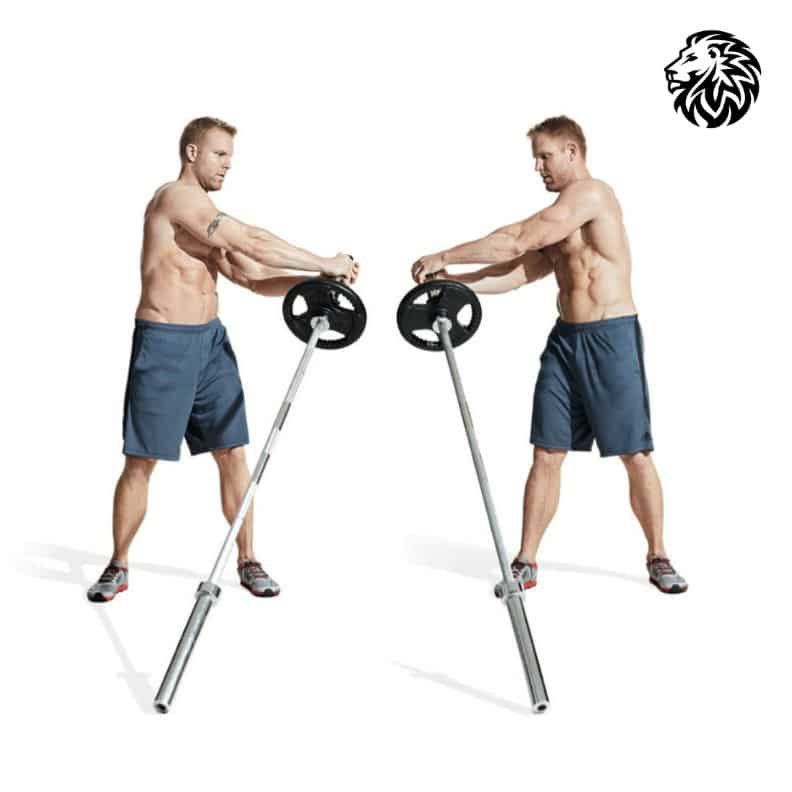
Introduction and Benefits: The Barbell Russian Twist is a dynamic exercise that targets multiple muscle groups, primarily focusing on the obliques, rectus abdominis, and the entire core region. This exercise not only aids in developing core strength and stability but also enhances rotational strength, which is crucial for various sports and daily activities. Additionally, it engages the shoulders and arms, providing a more comprehensive upper body workout.
Detailed Instructions:
- Starting Position: Sit on the floor with your legs extended in front of you. Hold a barbell with both hands in front of your chest, with a grip slightly wider than shoulder-width.
- Lifting Your Legs: Slightly bend your knees and lift your feet off the floor, balancing on your sit bones. Lean back a little to engage the core.
- Performing the Twist: Rotate your torso to one side, bringing the barbell towards the floor beside you. Keep your movements controlled and your core engaged.
- Alternate Sides: Rotate to the other side, bringing the barbell to the opposite side of your body.
- Repetition: Continue alternating sides for a total of 10-20 repetitions (each side counts as one repetition), depending on your fitness level.
Common Mistakes to Avoid:
- Rushing the Movement: Performing the exercise too quickly can reduce its effectiveness and increase the risk of injury. Focus on controlled, deliberate movements.
- Slouching Back: Avoid rounding your back. Maintain a straight spine to engage the core properly and protect your back.
- Over-Twisting: Twisting too far can strain the back. Rotate only as far as your flexibility allows while maintaining proper form.
- Holding Breath: Breathe regularly throughout the exercise. Exhale as you twist and inhale as you return to the center.
- Lifting Too Heavy: Starting with a barbell that’s too heavy can lead to form breakdown. Begin with a lighter weight and gradually increase as your strength improves.
- Ignoring Core Engagement: Ensure that your core is engaged throughout the exercise. Avoid letting your legs or arms do all the work.
Remember, the effectiveness of the Barbell Russian Twist lies in the quality of the movement, not the speed or the weight of the barbell. Proper form and controlled motion are key to reaping the maximum benefits from this exercise.
4. Medicine Ball Russian Twist
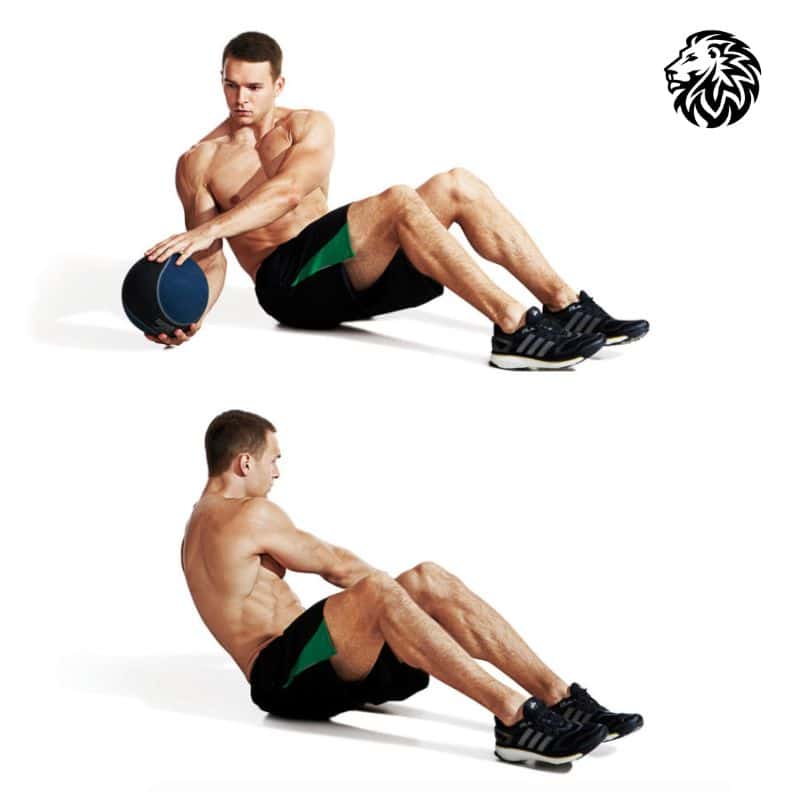
Overview of the Exercise: The Medicine Ball Russian Twist is a popular core exercise that focuses on the oblique muscles while also engaging the entire abdominal region. This exercise is similar to the Barbell Russian Twist, but it uses a medicine ball, making it more accessible and versatile. It’s excellent for improving core stability, rotational strength, and overall agility.
Technique and Posture Tips:
- Starting Position: Sit on the ground with your knees bent and feet flat on the floor. Hold a medicine ball with both hands in front of your chest.
- Lift Your Feet (Optional): For added intensity, lift your feet slightly off the ground, balancing on your sit bones.
- Leaning Back: Lean back slightly to engage your core muscles. Keep your spine straight and avoid rounding your back.
- The Twist: Rotate your torso to one side and gently touch the medicine ball to the ground beside you.
- Alternate Sides: Rotate to the opposite side, bringing the medicine ball across your body.
- Breathing: Exhale as you twist to each side and inhale as you return to the center.
- Eye Focus: Keep your eyes on the medicine ball as you twist. This helps maintain balance and enhances the rotational movement.
How to Increase the Difficulty:
- Increase Weight: Use a heavier medicine ball to add resistance, which will make the exercise more challenging.
- Elevate Your Legs: Keep your feet off the ground throughout the exercise to engage more stabilizing muscles.
- Slow Down the Movement: Perform the twists more slowly to increase the time your muscles are under tension.
- Add a Pulse: At each side of the twist, add a small pulsing motion to intensify the oblique engagement.
- Combine with Other Movements: Integrate the Russian Twist into a circuit or combine it with other exercises like crunches or planks for a more comprehensive core workout.
- Increase Repetitions or Duration: Either do more repetitions or set a timer and try to maintain the twisting motion for a longer period.
It’s important to start at a difficulty level that’s appropriate for your current fitness level and gradually progress. This ensures a safe and effective core workout, reducing the risk of injury.
5. Barbell Rollout
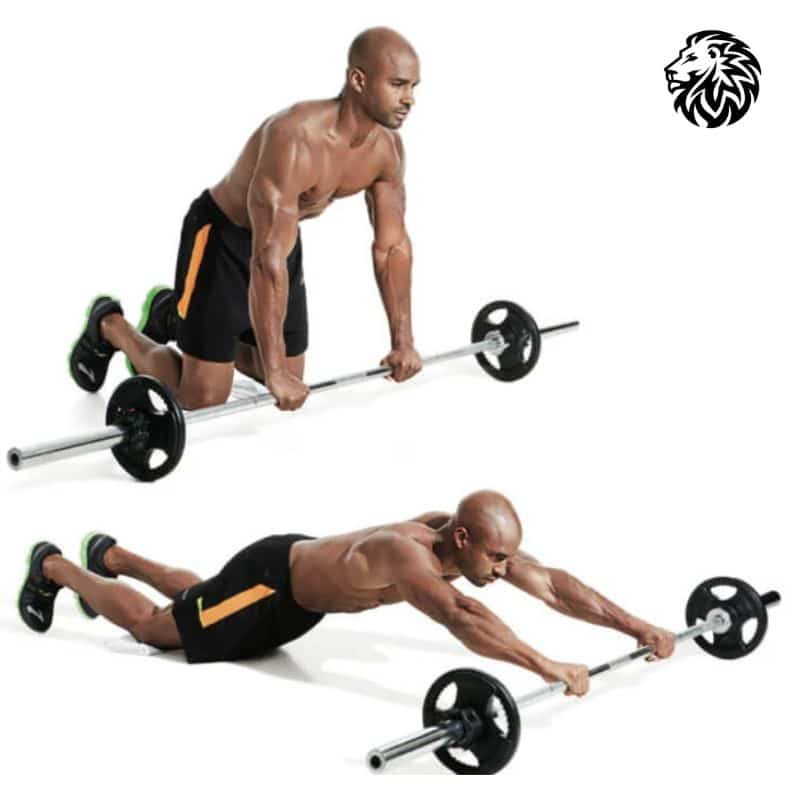
Explanation of the Exercise: The Barbell Rollout is an advanced core exercise that targets the rectus abdominis, obliques, and the lower back muscles, along with engaging the shoulders, chest, and arms. This exercise is renowned for its effectiveness in building core stability and strength. It involves rolling a barbell away from your body while in a kneeling position and then pulling it back, requiring significant control and strength in the core muscles.
Step-by-Step Guide for Proper Form:
- Equipment Setup: Place a weighted barbell on the ground. The weights on either side will help the barbell roll smoothly.
- Starting Position: Kneel on the floor with the barbell in front of you. Grip the barbell with both hands, shoulder-width apart.
- Engage Your Core: Before starting the movement, tighten your core muscles. This will protect your lower back and improve stability.
- The Rollout: Slowly roll the barbell forward, extending your body as far as you can without arching your back. Keep your arms straight throughout the movement.
- The Return: Using your core muscles, pull the barbell back towards your knees, returning to your starting position.
- Repetition: Aim for a set of 8-10 repetitions, depending on your fitness level.
Tips to Enhance Effectiveness:
- Maintain a Straight Line: Your body should form a straight line from your head to your knees when fully extended. Avoid sagging your hips or arching your back.
- Controlled Movement: Perform the rollout slowly and with control. Avoid using momentum as it reduces the effectiveness of the exercise and can lead to injury.
- Breathing Technique: Inhale as you roll the barbell forward and exhale as you bring it back in. Proper breathing helps maintain core engagement.
- Start with Partial Rollouts: If you’re new to this exercise, start by rolling out only partially and gradually increase the range as you get stronger.
- Use a Padded Mat: Kneeling on a padded mat can provide extra comfort for your knees.
- Progressions: Once you master the basic movement, increase the challenge by adding more weight to the barbell or by rolling out further, as long as you can maintain proper form.
Remember, the Barbell Rollout is a demanding exercise, so it’s important to listen to your body and progress at a pace that’s right for you. Consistency and proper form are key to reaping the benefits of this powerful core-strengthening workout.
6. Cable Kneeling Crunch
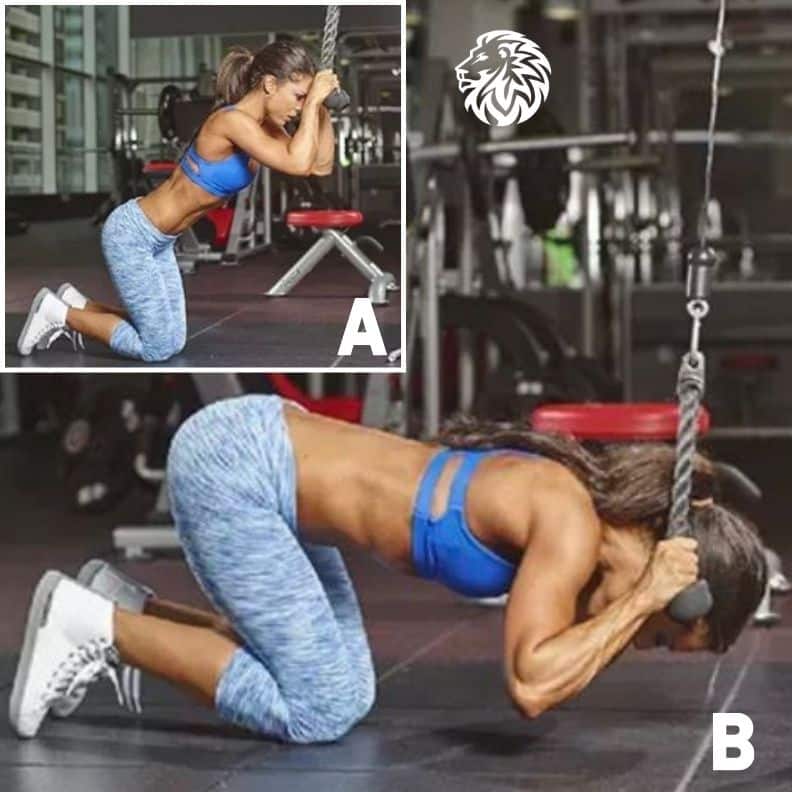
Introduction to the Exercise: The Cable Kneeling Crunch is a highly effective abdominal exercise that utilizes a cable machine to provide resistance. This exercise specifically targets the rectus abdominis or the ‘six-pack’ muscles, while also engaging the obliques and the core as a whole. It’s particularly beneficial for developing abdominal strength and definition due to the continuous tension provided by the cable machine.
Detailed Instructions for Execution:
- Setting Up the Machine: Attach a rope handle to the high pulley of a cable machine. Set the weight on the machine to an appropriate level for your strength.
- Starting Position: Kneel on the floor or on a mat about a foot away from the cable machine, facing the machine. Grasp the rope with both hands and bring it down to the sides of your head, near your ears.
- Engage Your Core: Before beginning the movement, tighten your core muscles. This will protect your spine and increase the effectiveness of the crunch.
- Performing the Crunch: Slowly contract your abdominal muscles to bring your head and chest towards your hips, curling your upper body forward and down. Your hips should remain stationary.
- Returning to Start: Slowly return to the starting position, maintaining tension in your abs throughout the movement.
- Repetition: Perform 10-15 repetitions per set, depending on your fitness level.
Variations for Different Fitness Levels:
- Beginners: Start with lighter weights and focus on mastering the form. The movement should be slow and controlled.
- Intermediate: Increase the weight for added resistance. You can also hold the contracted (crunched) position for a few seconds to intensify the exercise.
- Advanced: For a greater challenge, perform the exercise on one knee or with both knees lifted off the ground (in a half-kneeling stance). This variation not only increases the resistance but also improves balance and core stability.
- Additional Variation: Try performing the crunches with a twist at the end of the movement to target the obliques. As you crunch down, rotate slightly to one side, alternating sides with each repetition.
It’s important to perform the Cable Kneeling Crunch with proper form to avoid strain on the neck and spine. Focusing on a controlled movement and proper technique will ensure maximum engagement of the abdominal muscles and a more effective workout.
7. Hanging Leg Raises
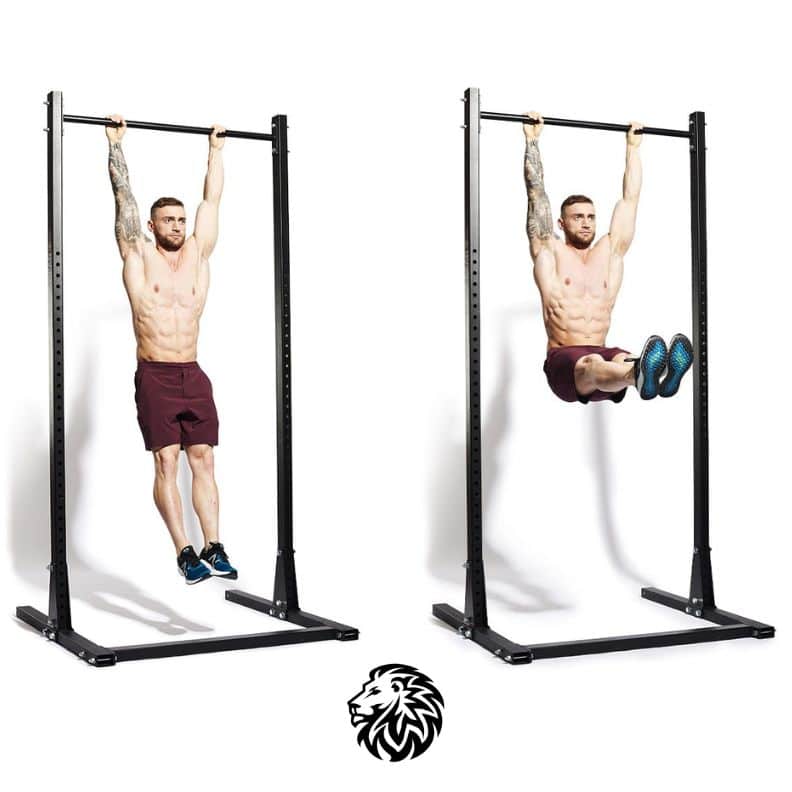
Benefits of the Exercise: Hanging Leg Raises are a highly effective exercise for targeting the lower abdominals, a region often difficult to isolate with other movements. This exercise also engages the hip flexors and, to a lesser extent, the obliques. Beyond core strengthening, it improves grip strength, shoulder stability, and overall body control. Hanging Leg Raises are particularly beneficial for enhancing core endurance, which is vital for athletic performance and everyday activities.
Comprehensive Guide to Performing It:
- Setup: Use a pull-up bar or a similar sturdy bar that can support your weight. Stand under the bar and grip it with your hands shoulder-width apart, palms facing away from you.
- Grip and Body Position: Hang from the bar with your arms and legs straight. Engage your core and shoulders to prevent swinging.
- The Raise: Exhale and slowly raise your legs in front of you. Keep your legs straight or with a slight bend in the knees if you’re a beginner.
- Height of Raise: Aim to raise your legs until they are parallel to the ground, forming a 90-degree angle with your torso. More advanced practitioners can raise their legs higher, towards the bar.
- Controlled Descent: Inhale as you slowly lower your legs back to the starting position, maintaining control and avoiding swinging.
- Repetition: Aim for 8-12 repetitions per set, depending on your fitness level.
Safety Precautions:
- Warm-Up: Ensure your shoulders and core are properly warmed up before attempting Hanging Leg Raises to prevent strain.
- Avoid Swinging: Control your body to prevent swinging, which can reduce the effectiveness of the exercise and increase the risk of injury.
- Grip Strength: If you find your grip giving out, you can use wrist straps to assist, allowing you to focus on the core engagement.
- Progress Gradually: Start with knee raises if leg raises are too challenging initially. As your strength increases, progress to straight-leg raises.
- Mind Your Lower Back: Avoid arching your lower back excessively. If you feel any discomfort in your lower back, stop and reassess your form.
- Listen to Your Body: If you experience any pain, particularly in the shoulders or lower back, stop the exercise. Consider consulting with a fitness professional to ensure proper technique.
Hanging Leg Raises are a challenging exercise, and it’s important to progress at a pace that’s comfortable for your fitness level. Consistent practice and attention to form will lead to improvements in core strength and stability over time.
8. Swiss Ball Jackknife
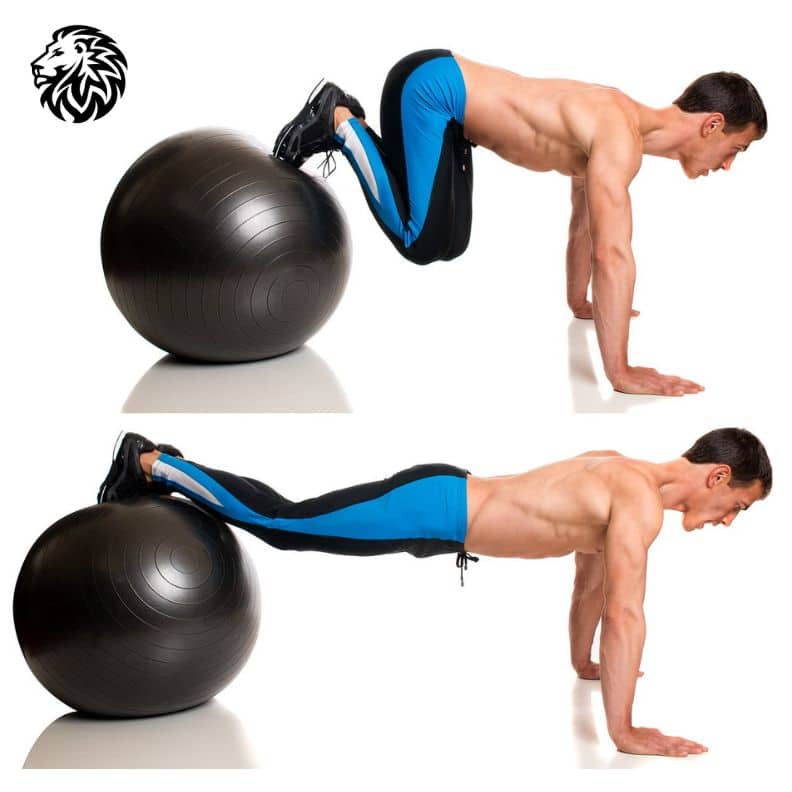
Overview of the Exercise: The Swiss Ball Jackknife is a dynamic core exercise that not only targets the abdominal muscles but also challenges the stability and strength of the entire body. This exercise is performed using a Swiss (stability) ball and involves a combination of a plank position and a knee tuck. It’s particularly effective for engaging the lower abdominals, obliques, and the rectus abdominis, along with the shoulders and arms.
Technique and Form Tips:
- Starting Position: Start in a push-up position with your feet placed on a Swiss ball. Your hands should be on the ground, positioned directly beneath your shoulders.
- Body Alignment: Keep your body straight from your head to your heels. Engage your core and glutes to maintain stability.
- Performing the Jackknife: Inhale and slowly roll the ball towards your chest by bending your knees and pulling them towards your elbows.
- Controlled Movement: Keep the movement controlled and avoid any jerky motions. Your upper body should remain stable and straight.
- Return Phase: Exhale as you extend your legs back to the starting plank position.
- Repetition: Aim for 8-12 repetitions per set, adjusting based on your fitness level.
Progression and Regression Strategies:
- Regression: If the standard Jackknife is too challenging, start with a simpler exercise like the Swiss Ball Plank, where you maintain a plank position with your feet on the ball. This helps build core strength and stability needed for the Jackknife.
- Intermediate Step: Before attempting the full Jackknife, you can try the Swiss Ball Pike, which involves lifting your hips towards the ceiling while keeping your legs straight. This movement helps build towards the coordination and strength required for the Jackknife.
- Progression: To increase the difficulty of the Jackknife, perform the exercise with one leg lifted off the ball. This unilateral movement increases the demand on your core and improves balance.
- Advanced Variation: For an additional challenge, after pulling your knees in, add a twist to engage the obliques. Twist your hips to bring your knees towards one elbow, alternating sides with each repetition.
Proper form is crucial in the Swiss Ball Jackknife to maximize its effectiveness and minimize the risk of injury. Be sure to start at a level that matches your current ability and progressively increase the difficulty as your strength and stability improve.
9. Swiss Ball Crunches
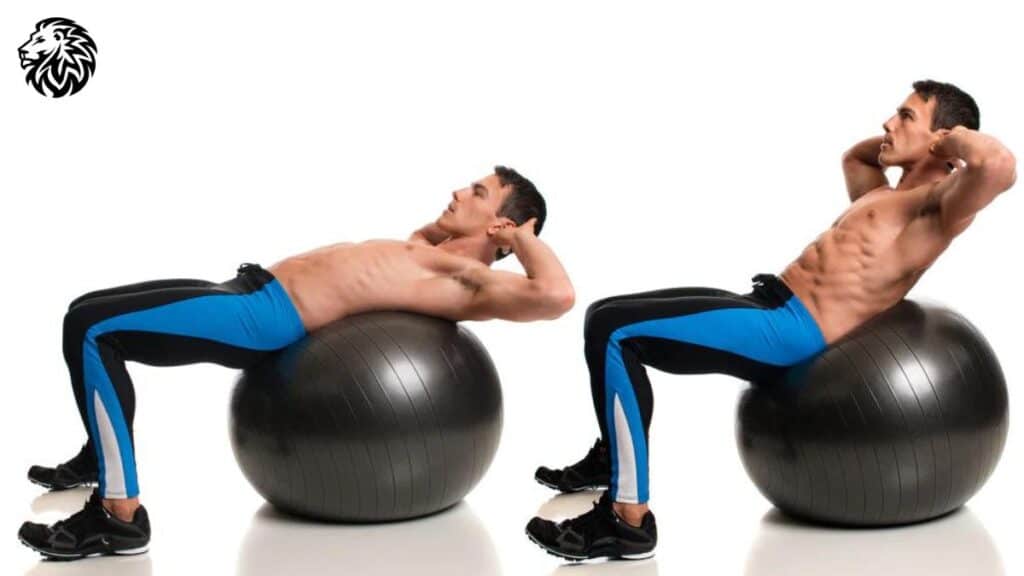
Explanation of the Exercise: Swiss Ball Crunches are a variation of traditional crunches performed using a stability or Swiss ball. This exercise primarily targets the rectus abdominis (the front part of the abdominals) and is effective in strengthening the core. The unstable surface of the Swiss ball increases the engagement of the core muscles, making this exercise more challenging and beneficial compared to floor crunches.
Step-by-Step Instructions:
- Selecting the Ball: Choose a Swiss ball that allows your knees to be at a 90-degree angle when seated.
- Starting Position: Sit on the Swiss ball and walk your feet forward, rolling the ball under your lower back until your thighs and torso are parallel to the floor. Your lower back should be well-supported by the ball.
- Hand Positioning: Place your hands behind your head, or cross them over your chest, whichever feels more comfortable.
- Performing the Crunch: Exhale and engage your core as you lift your upper torso by contracting your abdominal muscles. Lift only a few inches; the movement should be focused on curling your ribcage towards your pelvis.
- Controlled Movement: Slowly lower your back down to the starting position while inhaling.
- Repetition: Aim for 10-15 repetitions per set, depending on your fitness level.
Tips for Maximizing Effectiveness:
- Proper Positioning: Ensure the ball is positioned under your lower back to provide adequate support during the crunches.
- Controlled Motion: Avoid using momentum to lift your torso. The movement should be slow and controlled, focusing on engaging the abdominal muscles.
- Breathe Properly: Exhale as you crunch up and inhale as you return to the starting position. Proper breathing helps in engaging the core muscles effectively.
- Avoid Neck Strain: Keep your neck relaxed and in line with your spine. Do not pull on your neck with your hands.
- Maintain Stability: Engage your core throughout the exercise to maintain balance on the ball.
- Increase Difficulty Gradually: To make the exercise more challenging, you can hold a weight plate or a dumbbell across your chest, or extend your arms behind your head.
Swiss Ball Crunches are an excellent way to build core strength and stability. It’s important to focus on form and core engagement to get the most out of this exercise and to prevent any strain or injury.
10. Swiss Ball Bicycle Crunches
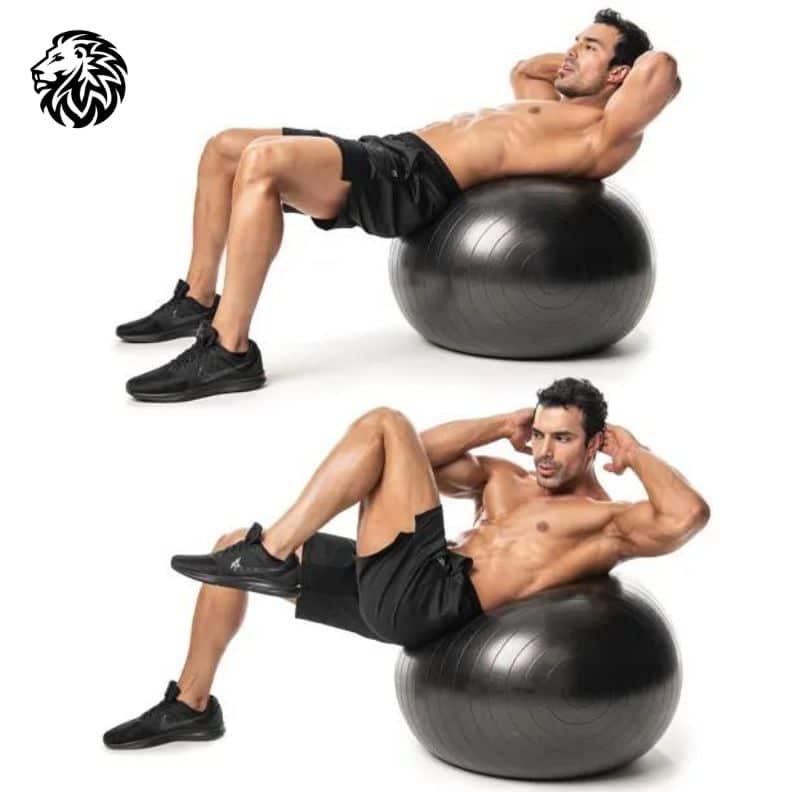
Introduction to the Exercise: Swiss Ball Bicycle Crunches are an effective core exercise that combines the instability of a Swiss ball with the dynamic movement of traditional bicycle crunches. This exercise targets the rectus abdominis, obliques, and the transverse abdominis, providing a comprehensive abdominal workout. It also challenges your balance and stability, making it an excellent choice for improving overall core strength and coordination.
Detailed Guide on Technique:
- Starting Position: Sit on a Swiss ball and carefully walk your feet forward as you lean back, rolling the ball under your lower to mid-back. Your thighs and torso should be parallel to the floor, and your lower back should be comfortably supported by the ball.
- Hand Positioning: Place your hands behind your head, ensuring not to pull on your neck.
- Performing the Crunch: Lift your shoulders off the ball slightly to engage your core. Bring one knee towards your chest while simultaneously twisting your torso to bring the opposite elbow towards the raised knee, mimicking a bicycle pedaling motion.
- Alternate Sides: Extend the bent leg back to the starting position while bringing the other knee towards your chest and rotating the opposite elbow to meet it.
- Breathing: Exhale as you twist and bring your elbow to your knee, and inhale as you return to the starting position.
- Repetition: Continue alternating sides for a set duration or a specific number of repetitions per side, typically 10-15 reps.
Common Errors and How to Avoid Them:
- Pulling on the Neck: Avoid pulling your head forward with your hands. Your hands should gently cradle your head, and the movement should come from your core.
- Losing Balance: If you find it challenging to maintain balance on the ball, start by performing the exercise with your feet wider apart for more stability.
- Excessive Twisting: While it’s important to rotate your torso, avoid over-twisting which can strain your back. The motion should be controlled and originate from the rotation of your core, not your arms.
- Rushing Through Repetitions: Perform the exercise in a controlled manner. Rushing through the movements can lead to a loss of form and reduced effectiveness.
- Arching the Back: Keep your lower back in contact with the ball to avoid straining it. If you feel your back arching, slow down the movement or reduce the range of motion.
- Ignoring Breathing: Proper breathing is key to engaging your core muscles effectively. Coordinate your breath with your movements for better stability and core activation.
Swiss Ball Bicycle Crunches, with their focus on technique and control, can significantly enhance core strength and stability when performed correctly. Be mindful of these common errors to maximize the benefits of the exercise and reduce the risk of injury.
11. Plank
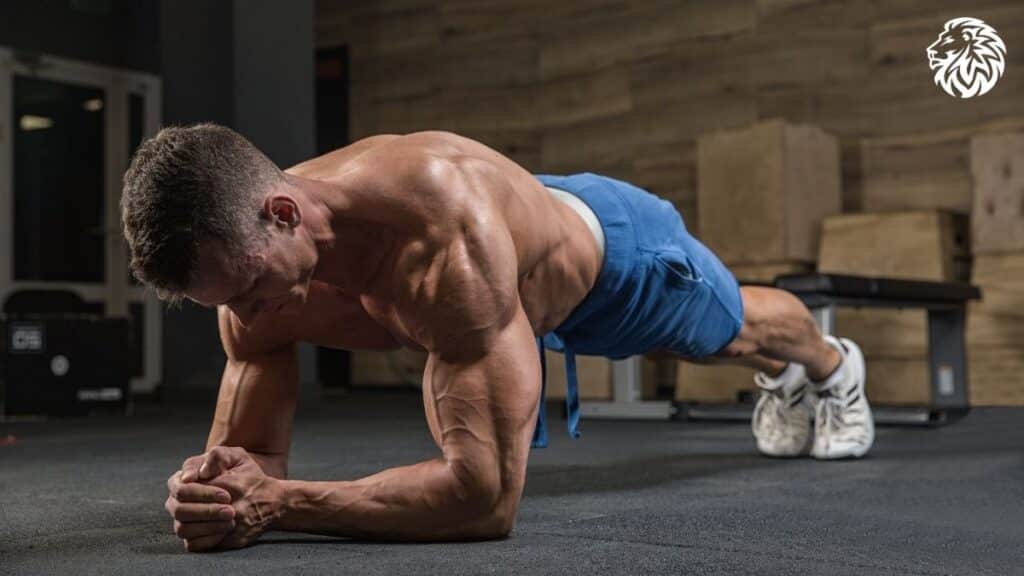
Benefits and Importance of the Exercise: The Plank is a fundamental core strengthening exercise that targets not just the abdominal muscles, but also the muscles of the back, shoulders, chest, and legs. It’s a form of isometric exercise, where muscles are contracted without movement. The benefits of the Plank include improved posture, enhanced core stability, reduced risk of back injury, and better balance. It’s particularly valuable as it engages multiple muscle groups simultaneously, making it an efficient full-body workout.
Proper Form and Variations:
- Standard Plank:
- Position: Start in a push-up position, with your forearms on the ground and elbows aligned below the shoulders. Your arms should be parallel to each other.
- Body Alignment: Keep your body in a straight line from your head to your heels, with your feet together or slightly apart.
- Engagement: Tighten your abdominals, glutes, and thighs to maintain a stable position.
- Gaze: Look down at the floor to keep your neck neutral.
- Variations:
- Forearm Plank: This is the standard variation described above.
- Straight-Arm Plank: Similar to the starting position of a push-up, with arms extended and hands beneath the shoulders.
- Side Plank: Lying on one side, lift your body by supporting it on one forearm or hand, with your feet stacked or one in front of the other.
- Plank with Leg Lift: Lift one leg at a time while maintaining the plank position.
- Plank with Arm Lift: Lift one arm at a time, extending it forward.
Tips to Increase Duration and Intensity:
- Gradual Progression: Start by holding the plank for shorter periods, like 20-30 seconds, and gradually increase the duration as you gain strength.
- Body Tension: Keep your entire body engaged. Tightening your core, glutes, and leg muscles will help you maintain form and increase endurance.
- Breathing: Focus on steady, controlled breathing. Holding your breath can make holding the plank more challenging.
- Regular Practice: Consistency is key. Regular practice will naturally improve your endurance and strength.
- Add Movement: Incorporate movements like plank jacks, mountain climbers, or rolling from a forearm plank to a side plank to increase intensity.
- Use Equipment: Adding a stability ball or BOSU ball for your feet or arms can increase the difficulty by introducing an element of instability.
The Plank is a versatile exercise that can be modified to suit various fitness levels. By maintaining proper form and gradually increasing the challenge, you can continue to build core strength and overall stability effectively.
12. Side-Plank
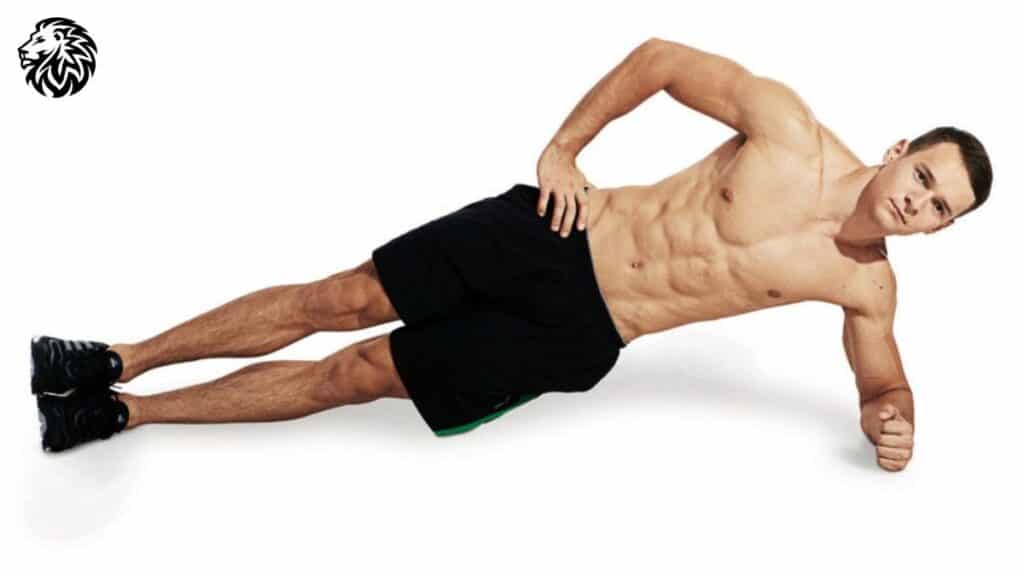
Overview of the Exercise: The Side-Plank is an effective isometric exercise that targets the obliques, which are the muscles on the side of the abdomen. It also engages the shoulders, hips, and lateral core muscles. This exercise is excellent for improving core stability and strength, enhancing balance, and supporting good posture and spinal alignment. It’s a variation of the traditional plank that focuses more intensely on the side muscles of the abdomen.
Step-by-Step Guide to Perfect Form:
- Starting Position: Lie on your side with your legs extended and stacked on top of each other. Prop your upper body up on your forearm, ensuring your elbow is directly under your shoulder for support.
- Lifting into the Side-Plank: Engage your core and lift your hips off the ground, forming a straight line from your ankles to your shoulders. Keep your head in line with your spine.
- Arm Placement: Your supporting arm should be perpendicular to the floor, and your other arm can be on your side or extended upwards towards the ceiling.
- Stability: Keep your hips high and your core engaged. Avoid letting your hips sag or lift too high.
- Hold the Position: Hold the side-plank position for a set duration, starting with 20-30 seconds and gradually increasing as you become stronger.
- Switch Sides: Repeat the exercise on the other side to ensure balanced strength and muscle development.
Advanced Variations for Experienced Individuals:
- Side-Plank with Leg Lift: While in the side-plank position, slowly raise your top leg and hold it for a few seconds before lowering it back down. This variation increases the intensity, especially on the outer thighs and glutes.
- Side-Plank with Rotation: From the side-plank position, rotate your torso and thread your extended arm underneath your body, then rotate back to the starting position. This adds a rotational movement, engaging the deep abdominal muscles.
- Side-Plank on Hand: Instead of resting on your forearm, extend your supporting arm fully, lifting your body up on your hand. This variation increases the challenge to your balance and arm strength.
- Elevated Side-Plank: Place your supporting elbow or hand on an elevated surface, like a bench or step. This variation changes the angle and intensity of the exercise.
- Side-Plank with Hip Dips: From the side-plank position, lower your hips towards the floor and then lift them back up to the plank position. This adds a dynamic movement, further challenging your obliques.
When performing the Side-Plank, it’s crucial to maintain good form to maximize its benefits and minimize the risk of injury. As you progress, these advanced variations can help to keep the exercise challenging and engaging.
Conclusion
Recap of the Key Points:
- Core Strength: The exercises discussed, ranging from the Abs Wheel Rollout to the Side-Plank, target the core muscles, including the abdominals, obliques, and lower back. Strengthening these muscles is crucial for overall fitness, stability, and injury prevention.
- Diverse Workouts: These exercises offer a variety of challenges, ensuring a comprehensive approach to core strengthening. They range from isometric holds like Planks to dynamic movements like the Swiss Ball Crunches.
- Adaptability for All Levels: Each exercise can be modified to suit different fitness levels, making this routine accessible and beneficial for both beginners and advanced individuals.
- Focus on Form: Proper technique is key in all these exercises to maximize effectiveness and prevent injury. Attention to form will also ensure that you are targeting the right muscle groups efficiently.
Encouragement to Incorporate These Exercises into a Fitness Routine: Incorporating these exercises into your regular fitness routine can lead to significant improvements in core strength, balance, and overall physical health. Whether you’re looking to enhance your athletic performance, improve your posture, or simply maintain a healthy body, these core exercises can be a valuable addition to your workout regimen.
Reminder of the Importance of Consistency and Proper Form: Consistency is essential when it comes to fitness. Regularly performing these exercises, while continually challenging yourself, will yield the best results. However, it’s equally important to maintain proper form. Not only does this ensure that you are safely and effectively engaging your muscles, but it also helps in avoiding any potential injuries. If you’re ever unsure about an exercise, don’t hesitate to seek guidance from a fitness professional.
Remember, fitness is a journey, and strengthening your core is a fundamental part of that journey. By integrating these core exercises into your routine, staying consistent, and focusing on proper form, you’ll be well on your way to a stronger, more balanced, and healthier body.


