Hey there! So, you’re looking to slim down your waist, right? Well, you’re in the right place. But before we dive into the exercises, let’s chat a bit about why focusing on your core is super important. It’s not just about looking good (though that’s a nice bonus!), it’s about feeling strong and stable, too.
Think of your core as your body’s powerhouse. It’s not just about your abs; it includes all those muscles around your trunk and pelvis. When they’re strong, everything else gets easier – from lifting groceries to rocking your favorite sports. Plus, a strong core means less chance of getting hurt, and who doesn’t want that?
And hey, let’s not forget about posture. A solid core helps you stand taller and sit straighter. You’ll look confident, reduce that annoying back pain, and maybe even say goodbye to that mid-afternoon slump.
But there’s more – working on your core can boost your overall health. It can make your breathing easier, keep your spine happy, and even help your digestion. Yep, those core exercises are like a secret weapon for your well-being.
Alright, enough talk! Let’s get to the fun part. I’ve got 10 awesome exercises lined up for you. They’re perfect for anyone, whether you’re just starting out or you’re already a workout pro. These moves will challenge you and help you on your journey to a slimmer waist, better health, and fantastic posture. Ready to get started? Let’s do this!
10 Best Exercises for a Slimmer Waist
Exercise 1: Planks
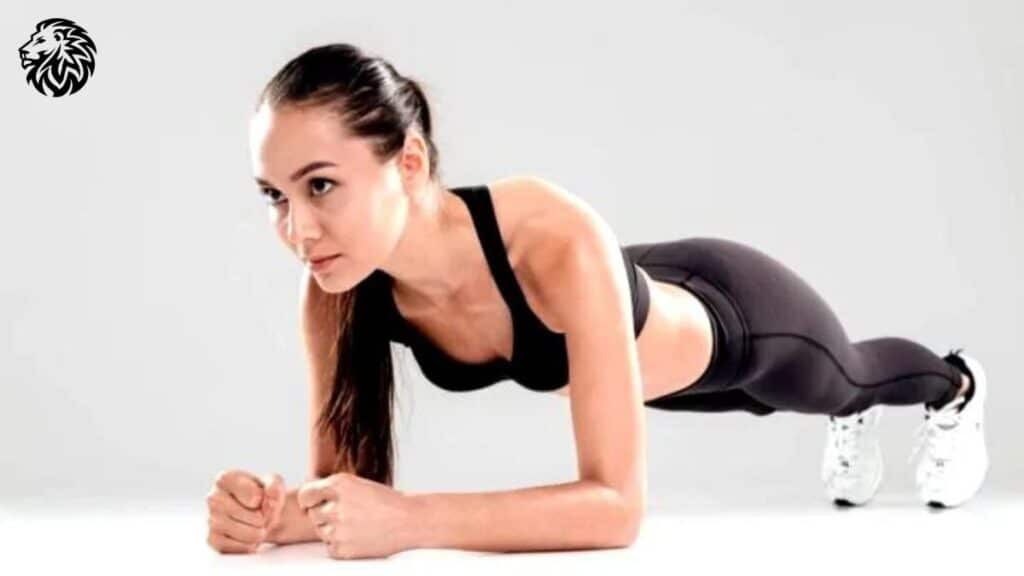
Ah, planks! They’re like the bread and butter of core exercises. Let’s break it down:
How to Do a Standard Plank:
- Start Position: Get into a push-up position, but instead of having your hands on the ground, rest on your forearms. Your elbows should be directly under your shoulders, and your arms parallel to each other.
- Forming the Plank: Extend your legs back, resting on the balls of your feet. You want your body to form a straight line from your head to your heels.
- The Hold: Engage (or squeeze) your core, thighs, and glutes. Keep your back flat, and don’t let your hips sag or stick up. Your head should be in line with your back, so try not to look up or down.
- Duration: Hold this position. Start with 20-30 seconds and gradually increase as you get stronger.
Variations for Beginners and Advanced Levels:
- Beginners: If holding a full plank is tough, no worries! Start with your knees on the ground. It’ll reduce the load but still work your core.
- Advanced: Feeling like a plank pro? Spice it up! Try lifting one leg, doing side planks, or even adding a leg lift while in a side plank. Want more? Try a forearm plank with alternating leg raises.
Benefits for the Core and Waist:
- Strengthens the Whole Core: Planks work not just your abs, but also your obliques (the side muscles) and deep core muscles.
- Improves Posture: By strengthening your core, planks can help you stand taller and more confidently.
- Enhances Stability: A stronger core means better balance in all your activities.
- Waist-Toning: Regularly doing planks can help tone and tighten your waist.
Remember, the key with planks is quality over quantity. It’s better to hold a shorter plank with good form than a longer one where you’re all wobbly. So, get down on that mat and start planking – your core will thank you!
Exercise 2: Russian Twists
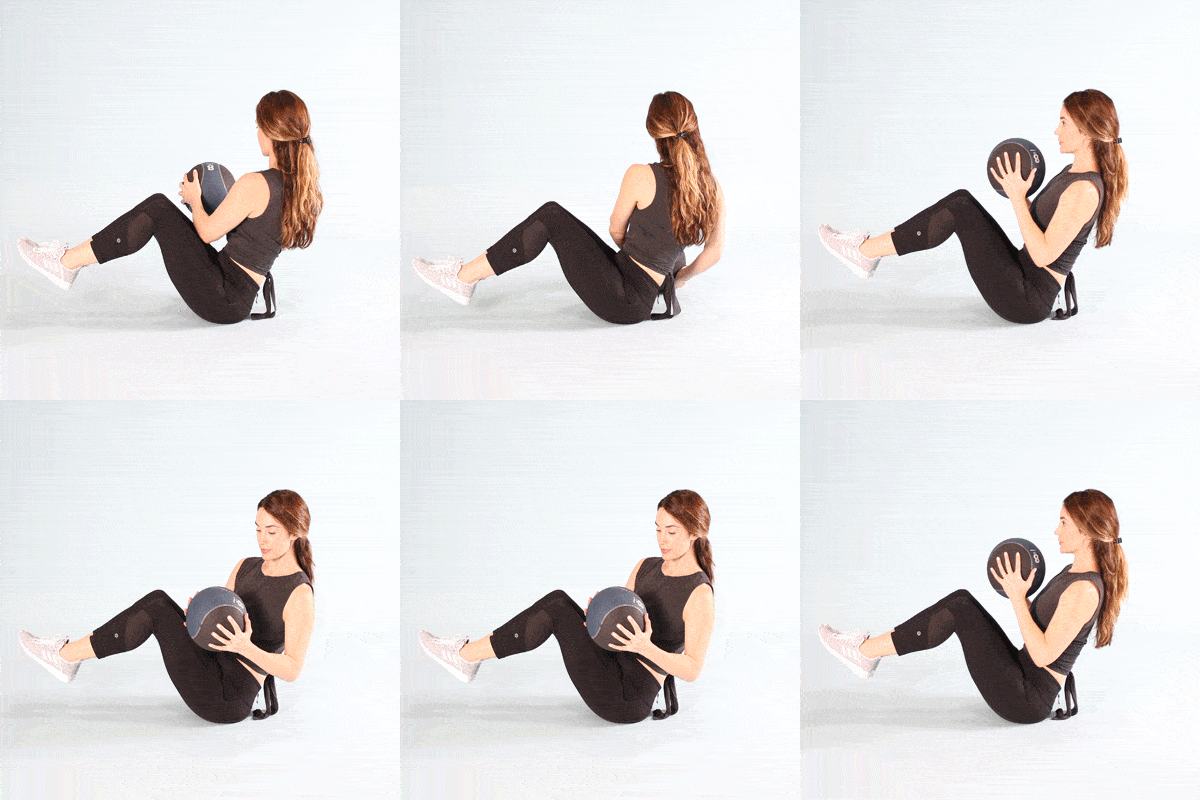
Russian twists are fantastic for targeting those oblique muscles – you know, the ones that really help define your waist. Here’s how to do them, with a few twists (pun intended) for all levels:
Step-by-Step Guide:
- Starting Position: Sit on the floor with your knees bent, feet flat on the ground. Lean back slightly, keeping your back straight, so your torso and thighs form a V shape.
- Lift Your Feet: If you can, lift your feet a few inches off the floor. If this is too challenging, keep your feet down but stay on your toes.
- Twist Time: Clasp your hands together in front of your chest, or hold them out straight. Now, twist your torso to the right, bringing your hands beside your right hip.
- Back to Center and Left: Return to center, then twist to the left. That’s one rep.
- Breathing: Exhale as you twist, inhale as you return to center. Keep your movements controlled.
Adding Weights for Increased Intensity:
- Beginners: Start without any weight, just using your body’s resistance.
- Intermediate: Grab a lightweight, like a dumbbell or a medicine ball. Hold it in your hands as you twist.
- Advanced: Increase the weight or even try doing the twist with a cable machine at the gym.
Focus on Oblique Muscles for Waist Slimming:
- Keep your abs engaged throughout the exercise. Imagine you’re trying to bring your rib cage closer to your hips with each twist.
- The movement should come from your waist, not your arms. Really focus on feeling the twist in your obliques.
- Control is key. It’s not about speed; it’s about precision and control of the movement.
Russian twists are a powerful move for slimming the waist, especially when done consistently and with proper form. And as you get stronger, you can up the ante with more weight or more reps. Twist your way to a stronger, slimmer waist!
Exercise 3: Bicycle Crunches
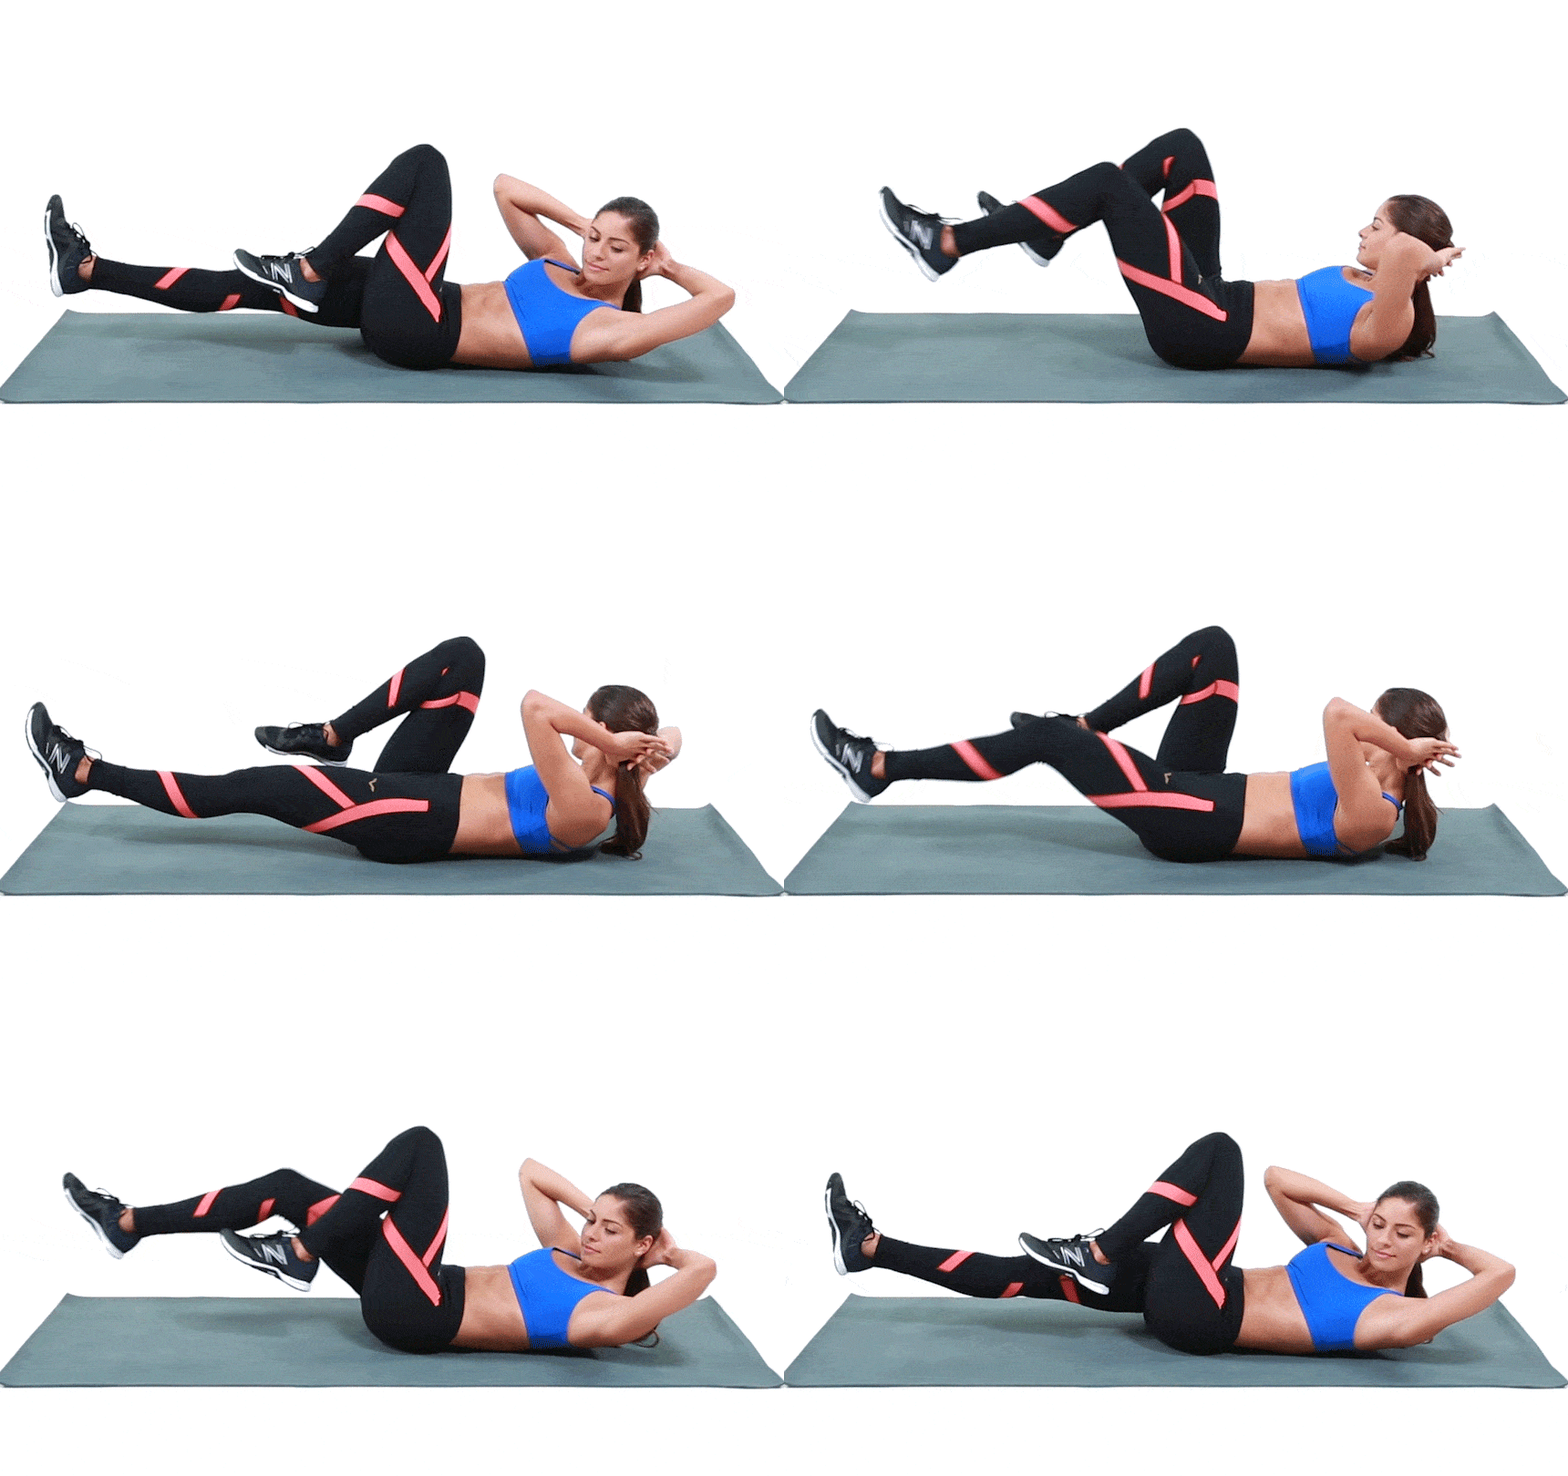
Bicycle crunches are a real game-changer for your core, especially when you nail the technique. They don’t just target your abs; they engage your entire core, including those hard-to-reach obliques. Here’s how to do them right:
Instructions for Proper Form and Technique:
- Starting Position: Lie flat on your back with your hands lightly touching the sides of your head, elbows wide. Bend your knees and lift your feet off the ground, so your thighs are perpendicular to the floor.
- The Movement: Bring your right elbow and left knee toward each other while straightening your right leg. Don’t let it touch the ground.
- Switching Sides: Now, bring your left elbow to your right knee while extending the left leg. This back-and-forth motion is like pedaling a bike.
- Breathing: Exhale as you crunch, inhale as you switch sides.
Emphasis on the Engagement of the Entire Core:
- The real magic happens when you focus on engaging your entire core. Imagine you’re trying to touch your elbow to your knee (even though they might not actually touch).
- Keep your movements slow and controlled. It’s not about how fast you can go, but how effectively you can engage those core muscles.
Tips for Avoiding Neck Strain:
- Don’t pull on your neck or head. Your hands are there just for light support.
- Keep your elbows wide throughout the exercise. This helps prevent you from yanking your head forward.
- Focus your gaze on the ceiling to keep your neck in a neutral position.
- If you feel strain in your neck, take a break, or try doing the exercise without the hand-behind-head position. Instead, keep your arms straight beside you as you perform the leg movements.
Bicycle crunches can be a bit challenging at first, but they’re incredibly effective for sculpting a strong, toned core. Remember, quality over quantity – doing a few reps with good form is way better than a bunch with poor form. Happy crunching!
Exercise 4: Pilates Side Bends
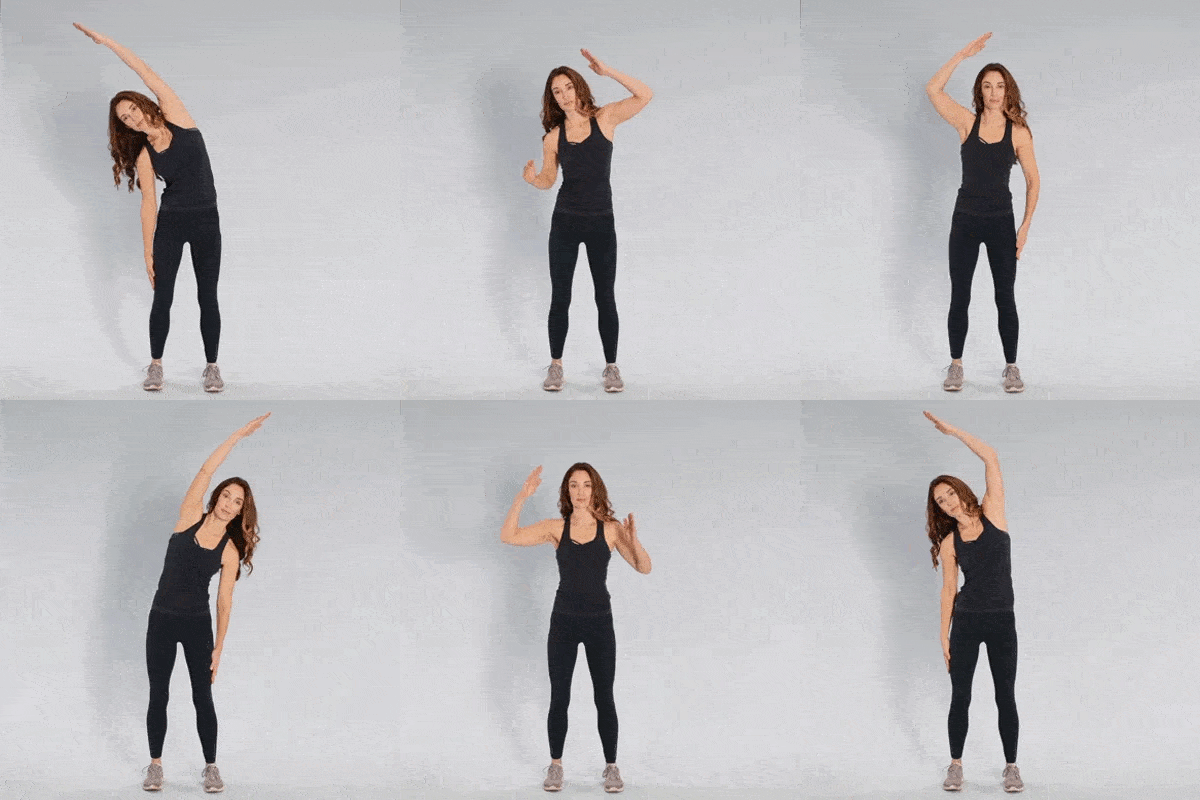
Pilates side bends are a fabulous way to zero in on your waist and obliques, those side muscles that really shape your midsection. They’re not just about strength; they’re about adding grace and flexibility to your core workout. Here’s the scoop on how to do them:
Explanation of Pilates Side Bends and Their Effectiveness:
- Pilates side bends are all about controlled, fluid movements that target the side muscles of your abdomen.
- They help in creating that coveted ‘hourglass’ figure by toning and strengthening the obliques.
- Besides working on your waist, these bends also improve your spine’s flexibility and stability.
Detailed Instructions for Beginners:
- Starting Position: Stand with your feet hip-width apart. Keep your arms by your side or place your hands on your hips.
- The Bend: Raise one arm overhead – let’s say the right arm. Now, bend your torso to the opposite side (left side in this case) while keeping your hips and legs stable. Imagine you’re between two panes of glass, so you’re only moving sideways, not forward or backward.
- The Return: Slowly come back to the upright position and lower your arm.
- Switch Sides: Repeat on the other side with your left arm going overhead and bending to the right.
- Breathing: Inhale as you bend, exhale as you return to the center. Keep your movements smooth and controlled.
How This Exercise Targets the Waist and Obliques:
- The side bending motion directly engages the oblique muscles, which are key to defining your waist.
- Maintaining stability in your hips and legs while you bend ensures that the work is focused on your waist, maximizing the toning effect.
- As you get more comfortable with the movement, try to increase the range of motion in your bend, always keeping the movement controlled and fluid.
Pilates side bends are a great way to add variety to your core workouts. They not only help in sculpting your waist but also contribute to overall core strength and better posture. Plus, they’re a nice change from the more traditional crunches and planks. Give them a try and feel those side muscles wake up!
Exercise 5: Mountain Climbers
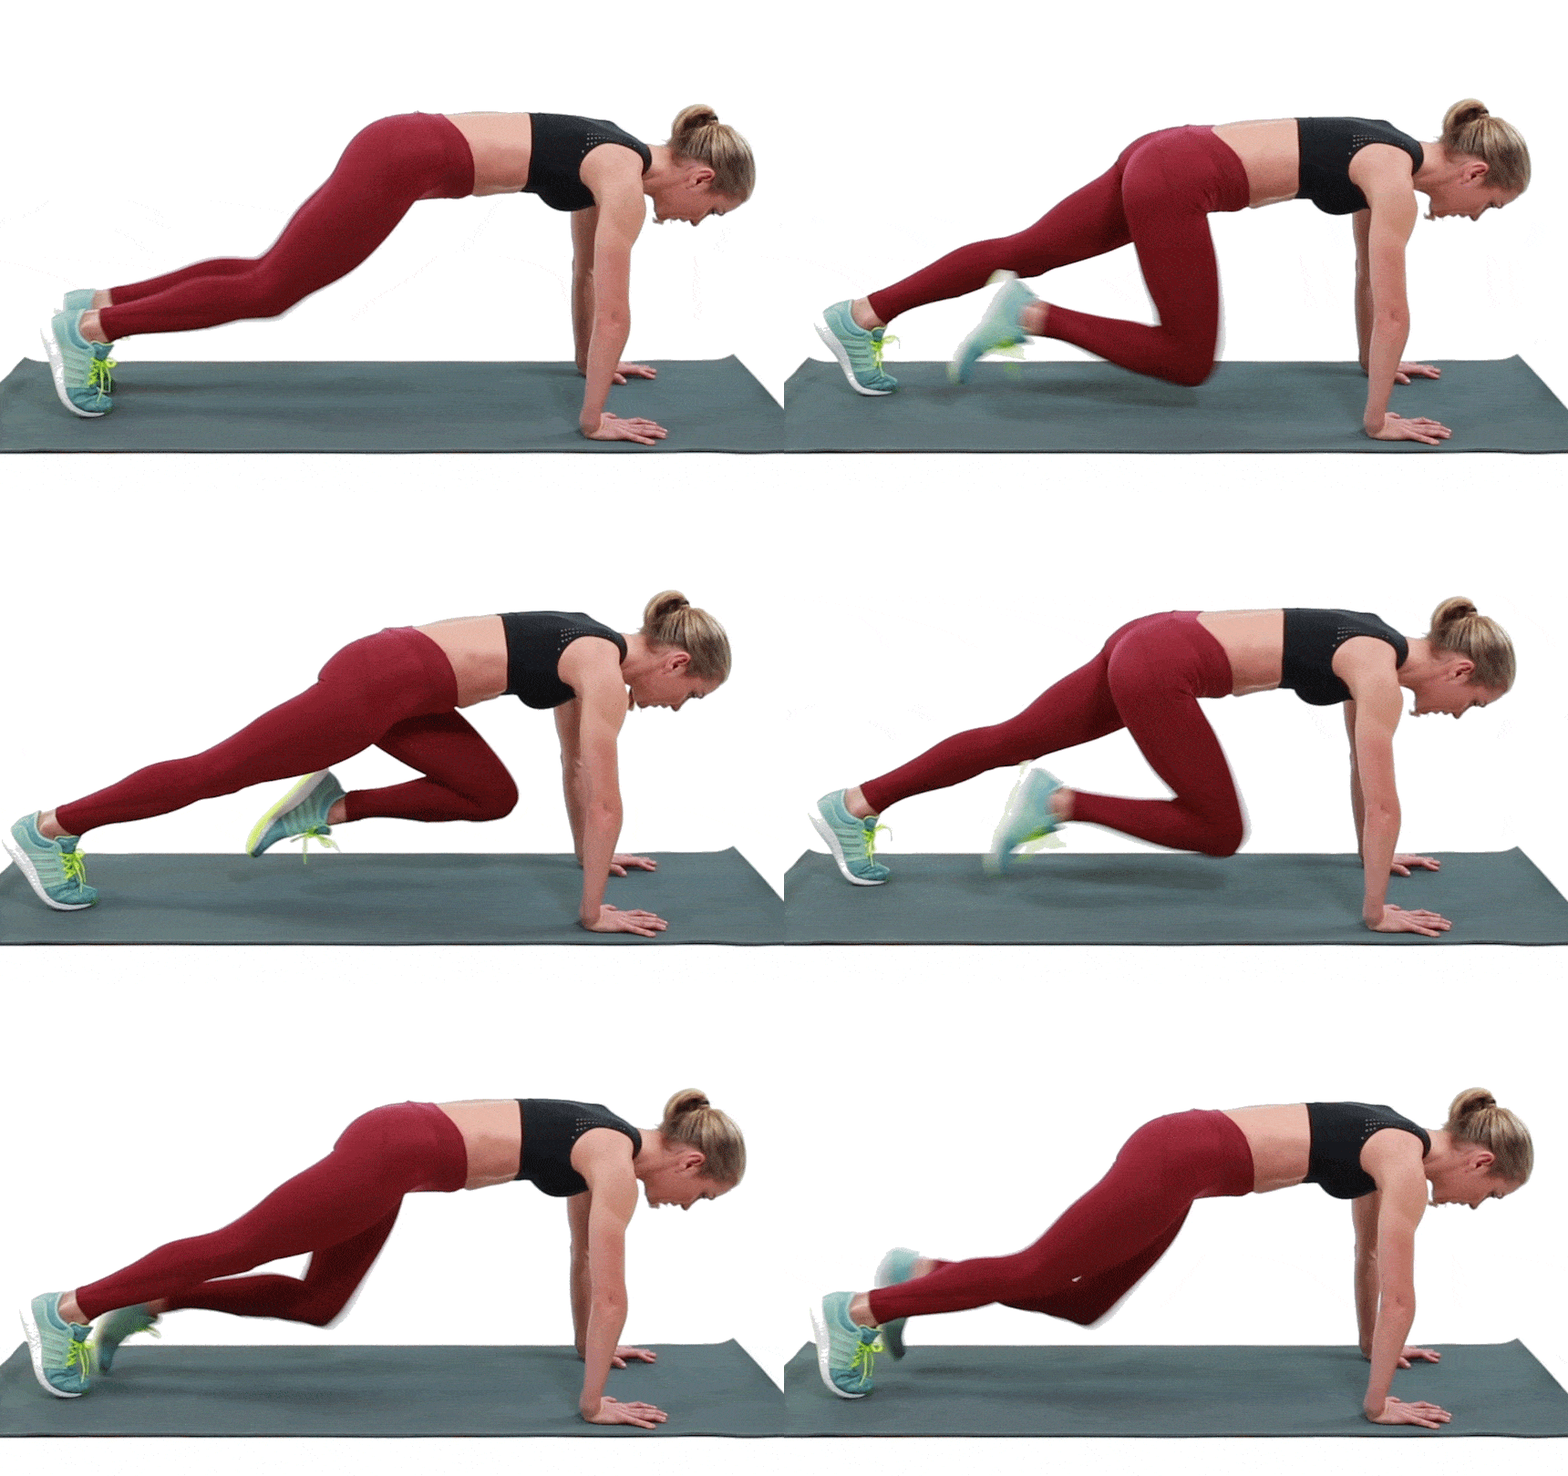
Mountain climbers are like the multitaskers of the exercise world – they’re great for cardio, and at the same time, they seriously work your core. Here’s how to nail this dynamic move:
Guide on How to Do Mountain Climbers Effectively:
- Starting Position: Begin in a plank position. Your hands should be on the ground directly under your shoulders, back flat, and your legs extended behind you.
- The Movement: Pull your right knee into your chest as far as you can.
- Switch Legs: Quickly switch, extending your right leg back to the plank position while pulling your left knee into your chest.
- Pace: Keep alternating your legs quickly. It’s like you’re running in place in a plank position.
- Keep Your Core Engaged: Your body should be straight from head to heels. Don’t let your hips sag or pike up.
Cardio Aspect and Core Strengthening:
- Cardio: Mountain climbers get your heart rate up fast, making them a great cardio workout. They’re perfect for getting in some high-intensity interval training (HIIT).
- Core Strengthening: This exercise requires you to stabilize your body with your core muscles, providing a great workout for the entire core, including your abs, obliques, and lower back.
Modifications for Different Fitness Levels:
- Beginners: Start slow. Focus on the form and bring your knees in one at a time at a slower pace. You can also step rather than jump your feet forward and back.
- Intermediate: Pick up the pace but maintain control and good form.
- Advanced: Add a twist! Literally. When you bring your knee in, twist your torso so your knee aims toward the opposite elbow. This engages your obliques even more.
Mountain climbers are a powerhouse move – they burn calories, build cardio endurance, and strengthen your core, all at once. Plus, you can do them anywhere, no equipment needed. Just remember to focus on form to get the most out of this exercise and to prevent injury. Ready to climb that mountain? Let’s go!
Exercise 6: Leg Raises
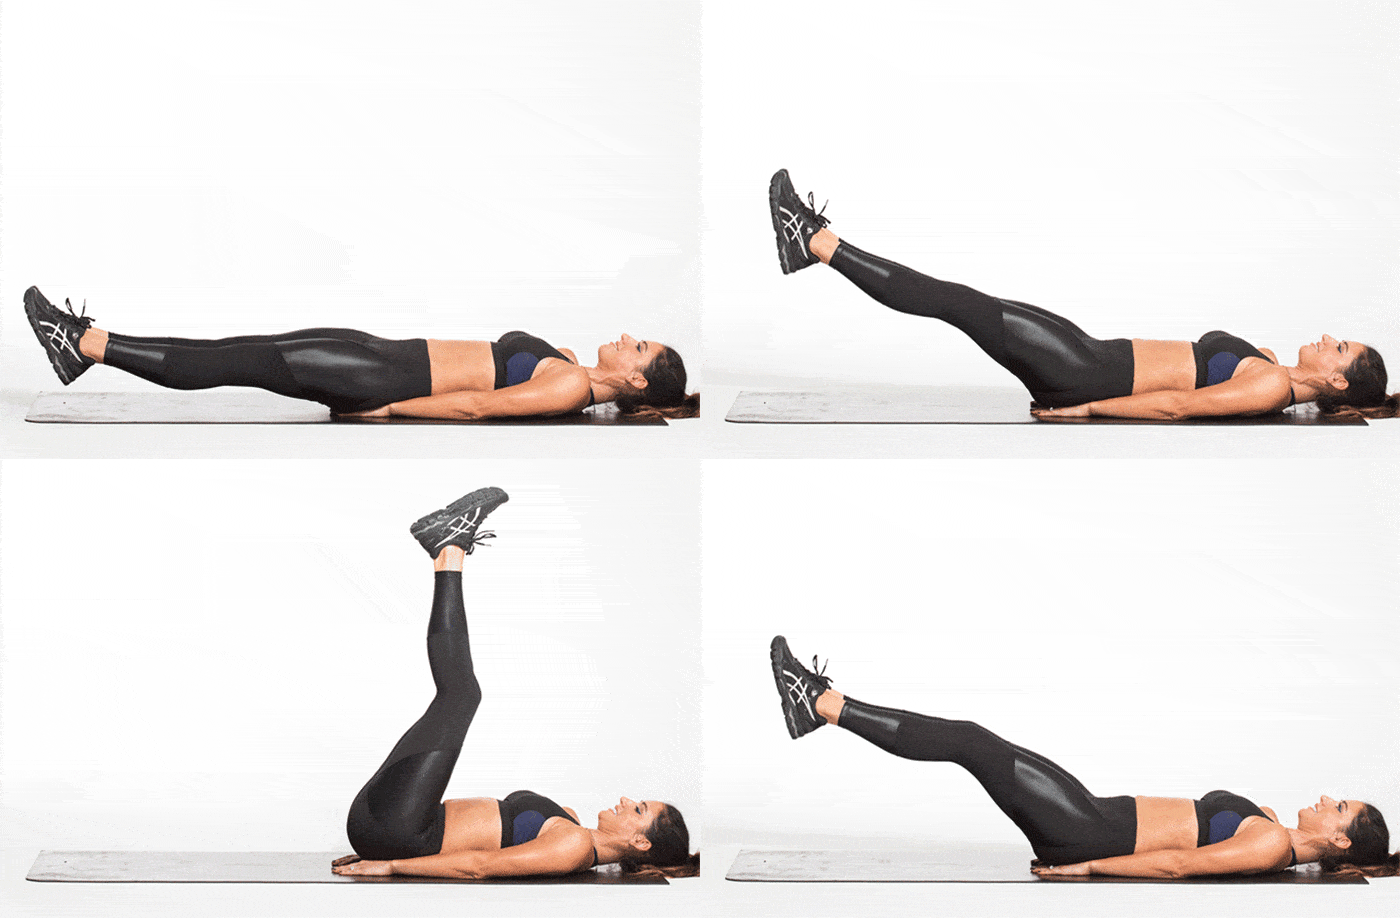
Leg raises are a classic core exercise that primarily targets your lower abs, a tricky area to tone. They’re straightforward but powerful when done with the right technique. Let’s break it down:
Technique for Performing Leg Raises Correctly:
- Starting Position: Lie flat on your back on a mat. Place your hands either under your glutes for lower back support or by your sides, palms down.
- The Lift: Keep your legs straight and together. Slowly lift them up towards the ceiling until they’re at a 90-degree angle with your torso.
- The Lowering: Just as slowly, lower your legs back down, but don’t let them touch the floor. This keeps the tension on your abs.
- Breathing: Exhale as you lift your legs and inhale as you lower them.
Importance of Lower Back Positioning:
- It’s crucial to keep your lower back pressed into the floor throughout the exercise. This reduces strain on your back and increases the effectiveness on your abs.
- If your back arches, try not to lower your legs as much. It’s better to do a smaller movement with proper form.
Variations for Targeting Different Areas of the Abdomen:
- Single Leg Raises: Instead of lifting both legs together, alternate lifting one leg at a time. This can be a good starting point for beginners.
- Flutter Kicks: With legs raised a few inches off the ground, make small, rapid up and down scissor-like movements with your legs.
- Hanging Leg Raises (Advanced): If you have access to a pull-up bar, try hanging leg raises. Hang from the bar and lift your legs up to your chest, keeping them as straight as possible.
- Inclined Leg Raises: Perform the leg raises on an incline bench to increase the intensity.
Leg raises are a deceptively simple but effective exercise for developing core strength and definition, especially in the lower abdominal area. Remember, the key is in the control – it’s not about how many you can do, but how well you do each one. Give these a go and feel the burn!
Exercise 7: Standing Oblique Crunches
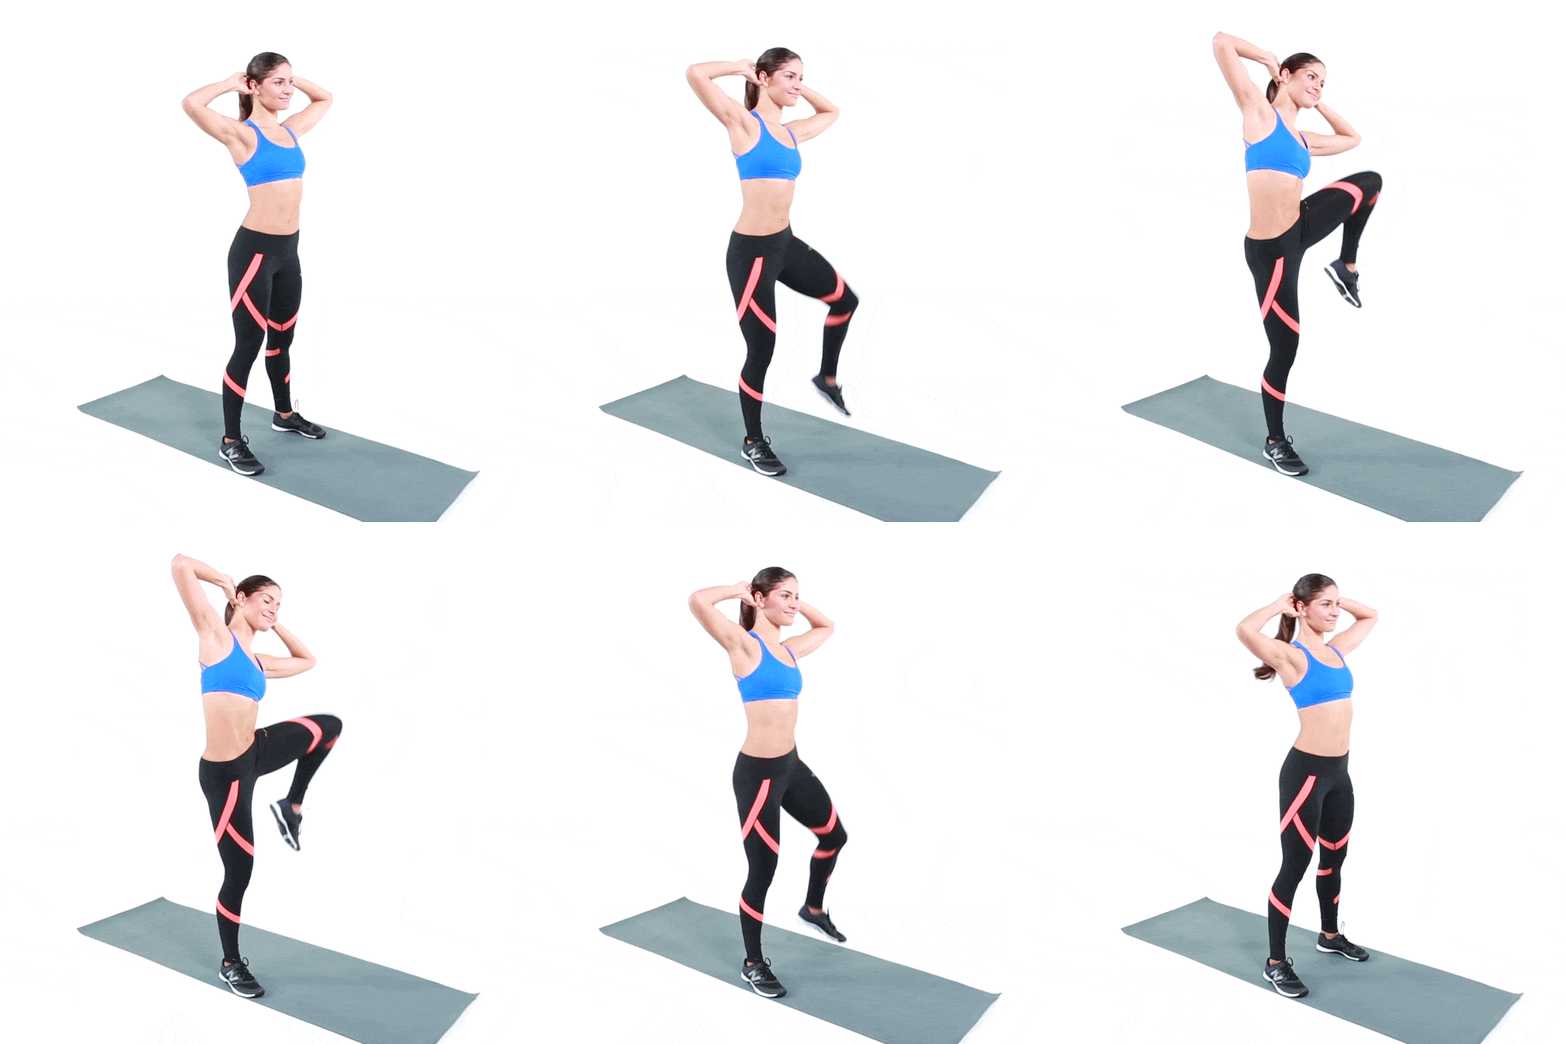
Standing oblique crunches are a superb exercise for targeting those side muscles of your waist – the obliques. Unlike floor crunches, they’re easier on your back and neck and can be done pretty much anywhere. Let’s dive into how to do them and why they’re great for your waist.
Description of the Exercise and Its Benefits for the Waist:
- Standing oblique crunches specifically work the sides of your abdominal area. They’re fantastic for toning and defining your waistline.
- Since you’re standing, they also engage more of your core muscles for stability, giving you a more comprehensive workout.
- They can help improve your balance and coordination, thanks to the standing position.
Step-by-Step Instructions:
- Starting Position: Stand with your feet shoulder-width apart. Place your hands behind your head with elbows wide, or let your arms hang by your sides.
- The Crunch: If your hands are behind your head, bring your right elbow down towards your right knee by bending to the side. Simultaneously lift your right knee towards your elbow.
- Return to Start: Slowly return to the starting position.
- Switch Sides: Repeat on the left side, bringing your left elbow towards your left knee.
- Repetitions: Aim for 10-15 crunches on each side. Remember, the movement should be controlled and deliberate.
How to Incorporate This into a Daily Routine:
- Standing oblique crunches are versatile and can be done almost anywhere – at home, in the office, or even in a park.
- Try incorporating them into your morning routine to wake up your muscles, or use them as a quick workout break during the day.
- They’re also great as part of a dynamic warm-up routine before a cardio or strength workout.
- If you’re short on time, doing a few sets of these throughout the day can add up to a significant workout.
Remember, with standing oblique crunches, it’s all about the quality of the movement. Focus on really engaging those oblique muscles with each crunch to get the most out of this exercise. It’s a simple yet effective way to work towards a more toned waist!
Exercise 8: High Knees
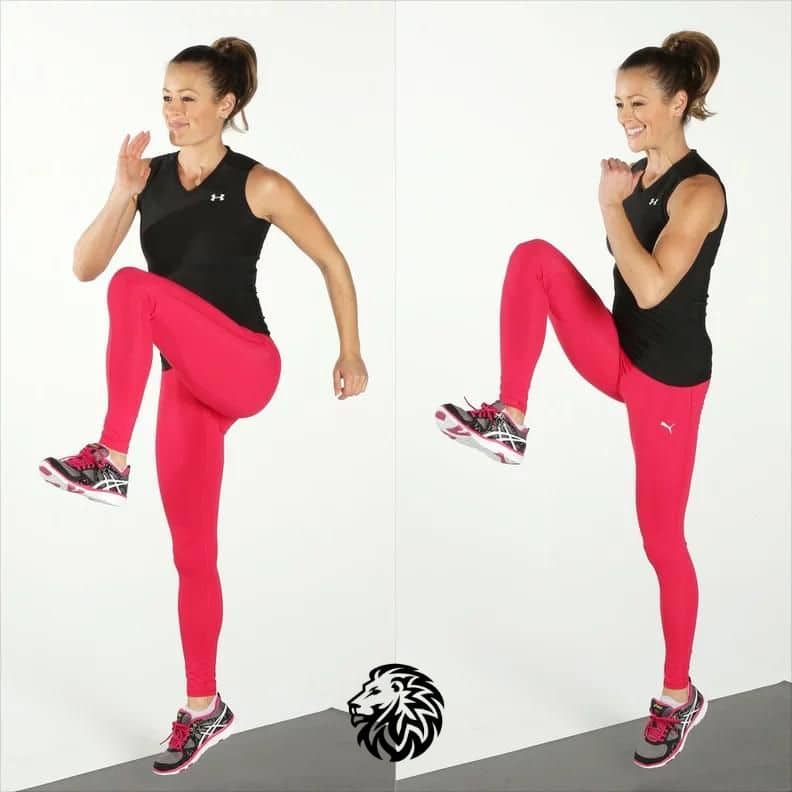
High knees are a fantastic, heart-pumping exercise that combines cardio with core strengthening. They’re simple but very effective, and you can do them just about anywhere. Here’s what makes high knees so great and how to do them properly:
Explanation of High Knees and Their Dual Benefit:
- Cardio: High knees are a form of high-intensity exercise that gets your heart rate up quickly, making them excellent for cardiovascular health and burning calories.
- Core Strengthening: As you lift your knees, you engage your core muscles, especially your lower abs. This helps in strengthening and toning your abdominal area.
Proper Form and Breathing Technique:
- Starting Position: Stand with your feet hip-width apart. Keep your back straight and look forward.
- The Movement: Start jogging in place, lifting your knees as high as you can with each step. Your thighs should try to reach parallel to the ground.
- Arm Movement: Swing your arms in rhythm with your legs to maintain balance and add intensity.
- Breathing: Breathe in a steady, rhythmic pattern. Inhale and exhale deeply to ensure your muscles get the oxygen they need.
How to Safely Increase Intensity Over Time:
- Start Slow: If you’re new to high knees, start with a slower pace and lower knee height. Focus on form and breathing.
- Gradually Pick Up the Pace: As you get more comfortable, gradually increase your speed and the height of your knees.
- Add Time Intervals: Begin with short intervals, like 20-30 seconds, and gradually increase to longer intervals as your endurance improves.
- Incorporate Intervals: Mix high knees with other exercises for a high-intensity interval training (HIIT) session. For example, do 30 seconds of high knees, rest for 30 seconds, and then switch to another exercise like jumping jacks.
- Use Weights: For an added challenge, you can hold light weights in your hands or wear ankle weights.
High knees are a fun and effective way to improve your cardiovascular fitness and strengthen your core. They can be a bit challenging at first, but with regular practice, you’ll see improvements in your endurance, core strength, and overall fitness. So, get those knees up and enjoy the burn!
Exercise 9: Scissor Kicks
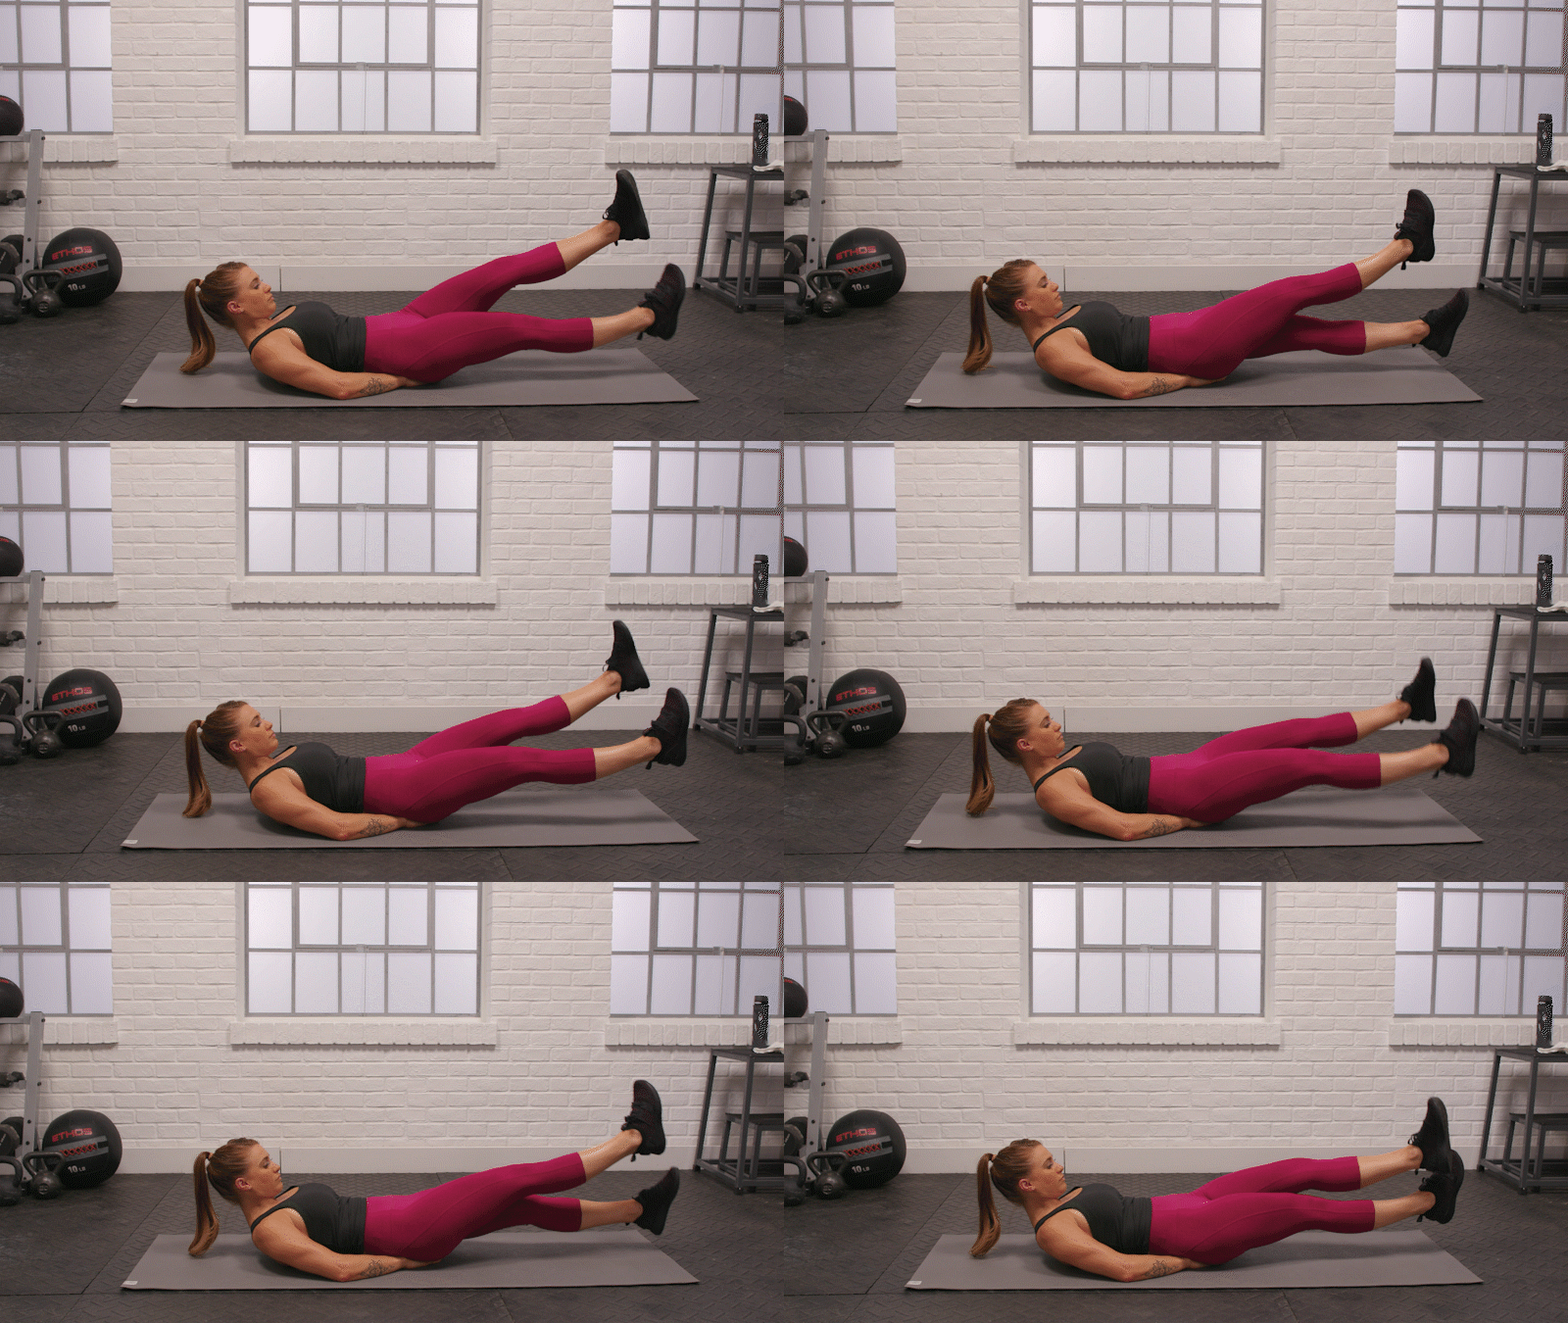
Scissor kicks are a superb exercise for targeting your lower abs, a region often missed by more traditional exercises. They’re all about precision and control. Let’s dive into how to perform them effectively:
Detailed Instructions for Performing Scissor Kicks:
- Starting Position: Lie down flat on your back on a mat. Place your hands under your lower back or glutes for support. This helps protect your spine.
- Leg Positioning: Lift your legs off the ground to about a 45-degree angle, or higher if it’s more comfortable. Keep your legs straight and your toes pointed.
- The Movement: Start moving your legs up and down in an alternating fashion, like a pair of scissors opening and closing. One leg goes up while the other goes down, but don’t let them touch the ground.
- Controlled Pace: Move in a slow, controlled manner. It’s not a race! The slower you go, the more you’ll engage your abs.
Emphasis on Lower Abdominal Engagement:
- To really target your lower abs, focus on pulling your belly button in towards your spine. This helps activate the deep core muscles.
- Keep your movements smooth and steady. Jerky movements can shift the focus away from your abs.
- The height of your legs can increase or decrease the intensity. Lower legs make it harder, while higher legs make it a bit easier.
Tips for Maintaining Form and Preventing Injury:
- Keep your lower back pressed into the ground. If it starts arching, raise your legs higher or take a break.
- If you feel strain in your neck, relax your head and neck by placing a small cushion or folded towel under your head.
- Breathe evenly throughout the exercise. Holding your breath can increase blood pressure and strain.
- Start with shorter durations and gradually increase as you build strength. For instance, begin with 30 seconds and work your way up.
Scissor kicks are great for developing core strength, particularly in the lower abs. They can be a bit challenging at first, but with practice, you’ll definitely feel the difference they make. Remember to listen to your body and adjust the exercise to suit your fitness level. Happy kicking!
Exercise 10: Wood Choppers
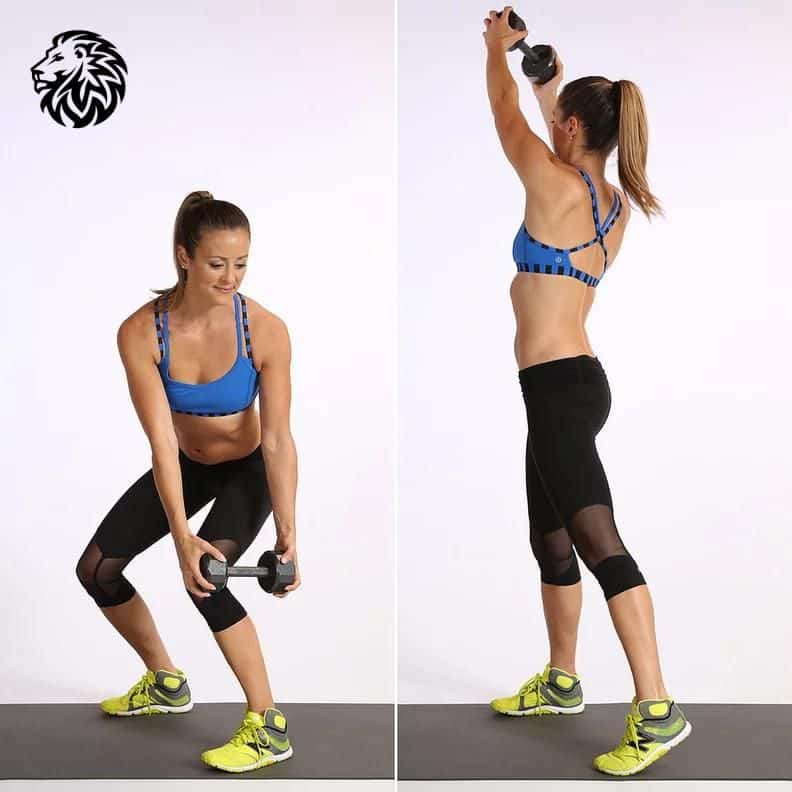
Wood choppers are an excellent exercise for slimming the waist and building functional strength, thanks to their rotational movement. They can be done with or without weights, making them versatile for any fitness level. Let’s chop into the details:
Guide on Performing Wood Choppers:
- With Weights:
- Starting Position: Stand with your feet shoulder-width apart. Hold a dumbbell, medicine ball, or kettlebell with both hands.
- The Lift: Twist your torso to lift the weight over one shoulder; let’s say the right shoulder.
- The Chop: In a smooth, controlled motion, bring the weight down and across your body to the outside of your opposite knee, mimicking a chopping motion.
- The Return: Return to the starting position, lifting the weight back over your shoulder.
- Switch Sides: After completing your reps on one side, switch to the other side.
- Without Weights:
- Follow the same motion but clasp your hands together or hold a small ball. Focus on the rotational movement and your form.
Focus on Rotational Movement for Waist Slimming:
- The twisting motion is key to this exercise. It engages your obliques and helps in slimming and toning your waist.
- Visualize yourself wringing out your waist like a towel with each rotation, really focusing on the side muscles.
Safety Tips and Posture Alignment:
- Keep your knees slightly bent to avoid strain on your lower back.
- Engage your core throughout the movement for stability.
- Start with a lighter weight to get the motion down before increasing the weight.
- Make sure your movements are controlled, especially when using weights. Avoid jerky motions which can lead to injury.
- Pay attention to your posture: keep your back straight, and avoid rounding it as you bend.
- Breathe out as you chop down and breathe in as you return to the starting position.
Wood choppers are not only great for your waist but also help in improving your overall functional strength and coordination. They’re a dynamic and fun addition to any workout routine, giving you that satisfying feeling of chopping away the calories!
Conclusion
We’ve just explored a fantastic lineup of exercises, each uniquely beneficial for sculpting a slimmer waist and strengthening your core. From the classic planks and Russian twists to dynamic moves like mountain climbers and high knees, each exercise targets your core in a different way, ensuring a well-rounded approach to fitness. Leg raises, standing oblique crunches, and scissor kicks specifically work on those tricky lower abs and obliques. And don’t forget the functional power of exercises like wood choppers, which not only slim your waist but also enhance your overall strength.
Now, I encourage you to weave these exercises into your regular fitness routine. Mix and match them, try different combinations, or focus on a few at a time – the key is consistency. Remember, it’s not about doing everything at once but about finding a sustainable and enjoyable routine that works for you.
As you embark on this journey, don’t forget the importance of a balanced diet. Nutrition plays a crucial role in achieving any fitness goal. Pair your workout regime with a healthy, balanced diet to really see the best results. Think whole foods, lean proteins, plenty of veggies, and adequate hydration. And yes, occasional treats are perfectly fine – it’s all about balance!
Lastly, remember that consistency is your best friend in fitness. Regular exercise, combined with good nutrition, is the most effective way to achieve and maintain a slimmer waist and a healthier body. Keep moving, stay motivated, and enjoy every step of your fitness journey. Here’s to a stronger, healthier you!

4 thoughts on “10 Best Exercises for a Slimmer Waist”
Awesome!
Good article. Very helpful
I like the detail you go into for each exercises.
This article is a fantastic resource for anyone looking to slim down their waist, offering a well-rounded selection of effective exercises. Each exercise is explained clearly, making it easy to follow along and incorporate into a routine. It’s practical and encouraging, perfect for anyone at any fitness level looking to tone up.